Receipts and payments

Bank Payments and Bank Receipts

- From the Nominal Ledger Tab on the Client Menu double-click on Data Entry or select and click Goto.

- Choose Bank Payments or Bank Receipts from the Data Entry window, click on Add, or double click.

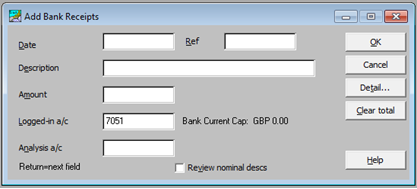
The fields are the same in each screen:
|
Date |
Enter the date of the transaction. |
|
Ref |
Enter a reference for the transaction. |
|
Description |
Enter a narrative for the transaction up to 30 characters long. |
|
Amount |
Enter the amount of the transaction. |
|
Logged-in a/c |
The nominal ledger code where the payment is made to/from. This account defaults to the current Logged-in account but can be overridden at time of data entry. |
|
Analysis a/c |
The nominal ledger code which represents the ‘other’ side of the payment/receipt. |
|
Review nominal descs |
When ticked, allows the description of the nominal ledger account to be edited. |
CCH Trust Accounts 2020.1 and later - The last 10 descriptions used now appear in a dropdown in the Data Entry options for Payments, Receipts and Journals. The dropdown is cleared when you exit the option.
Tip: To speed up data entry use the Return or Enter rather than the Tab key. When entering a nominal code, press F2 to select a code from the Client Chart and, if necessary, copy a nominal code from the Master Chart.
Batch entry
To enter payments/receipts as batch entries rather than as individual entries from the bank account:
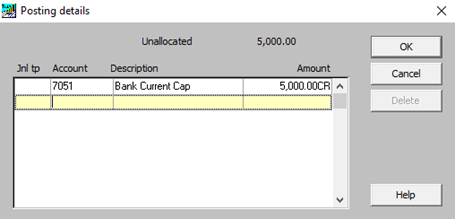
- Enter the total payment or receipt in the Amount field and click on Detail … the following dialogue window opens, showing the total, enter row by row until the Unallocated amount is 0.00.
- Use F2 in the Account column to select the nominal code or enter directly.
- Credit amounts must be entered as a negative figure.

Once the entry is complete click OK. The entry details dialogue window will appear.

|
Close |
Click this button to accept the details of the transaction. |
|
Additional… |
Allows further information relating to the transaction to be entered. |
|
Postings… |
Returns to the Posting details window. |
Click on Close to return to the Bank Payments window and click OK for the entry to be posted.
If further transactions need to be entered, follow the same procedure outlined above, otherwise click Cancel.
