Investment Ledger entries

How to enter Investment ledger entries
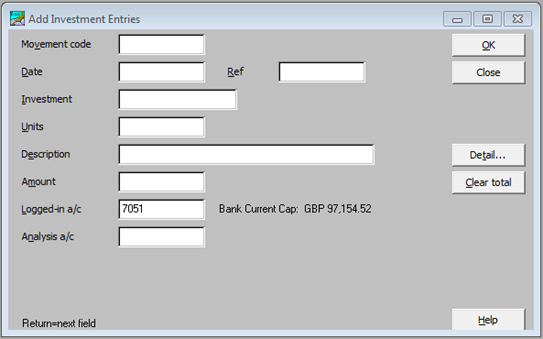
From the Data Entry window, to enter security transactions, select Investment Entries, which will then display the Add Investment Entries window.

|
Movement code |
F2 to enter the movement code, select from the drop-down list. A code can be entered directly without using the F2 key. |
|
Date |
Enter the date of the transaction. |
|
Ref |
Enter a reference for the posting if required. |
|
Investment |
F2 to enter the desired investment, select from the investment ledger. Note: If an investment is not available, it can be added at this point. |
|
Units |
Enter the number of units relating to the transaction. |
|
Description |
A default description appears but can be amended. |
|
Amount |
Enter the amount of the transaction. |
|
Logged-in a/c |
Amend the Logged-in account if necessary. This is usually a bank account or stockbrokers account unless you are posting historical data, in which case it should be the Suspense account. |
|
Analysis a/c |
The Analysis account defaults to the code that has been entered for the investment depending on the movement code used. |
Once the above information has been entered Entry details appears

|
Close |
Closes this window. |
|
Additional… |
Allows additional information to be added to this transaction. |
|
Postings… |
Shows the actual postings that have been entered. |
|
CGT details… |
Allows you to make (or amend) any entries relating to CGT in respect of the transaction. |
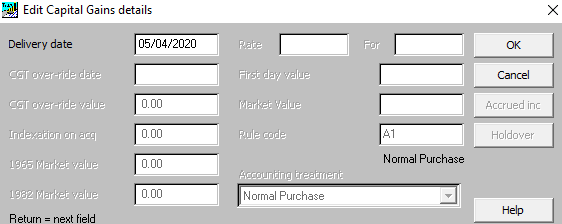
If you click on CGT details, the Edit Capital Gains details window appears.
|
Delivery Date |
Most users do not enter this field. If not entered, it defaults to the transaction date. For the record, the delivery date has two functions. The first is that it was used to record the settlement date because this date used to affect the matching of ‘relevant securities’. The second use is on bonuses, rights and stock dividends, where it is shown as the Ex-date. |
|
CGT over-ride date and value |
These fields are used to specify the date and value to be used by the CGT application instead of the transaction date and value. They are used when the treatment of a transaction for accounting purposes, e.g. on the investment schedule, is different from its treatment for CGT purposes. In practice, these fields are normally filled in automatically using the CCT Wizard. They can only be entered if the movement code has the CGT override attribute ticked. If the CGT override date is not required, it can be left blank. If the CGT override value is not required, it can be left as zero. If used, the CGT override value should be in the System Default Currency, i.e. the CGT currency. |
|
Indexation on acq |
This field is used when taking on the value of a CGT pool, for example, the s104 pool. The field is only available if the movement code has the Indexation Accrued attribute ticked. In practice, this field is normally filled in automatically using the CCT Wizard. |
|
1965 and 1982 market value |
The UK CGT calculation usually requires the 1982 Market Value of an acquisition made before 01/04/1982. This field can be entered on the security. However, if specified on an individual transaction, then the value on the transaction overrides the value on the security. The same principle applies in the UK to acquisitions before 06/04/1965. These fields are available if the transaction date (or CGT override date if specified) is before 06/04/1982 or 06/04/1965. |
|
Rate, For |
The Rate and For fields are used on bonus, rights and similar transactions where new shares are issued in a ratio to the existing holding. For instance, if a bonus issue distributes 1 new share for every existing share then the For field would be 1 and the Rate field would be 1. This is shown as 1:1. When the Rate and For fields are initially entered the units on the bonus or rights are calculated. If the fields are edited the units are recalculated. However, after this the Rate and For fields are for memorandum purposes only. |
|
First Day Value, Market Value |
On transactions for a sale of rights and other similar entries, cash is received but the holding is not reduced. This is sometimes referred to as a ‘part disposal’ (even though no part of the holding is actually sold). For ‘small’ disposals the accounting and CGT treatment is usually to reduce the cost of the holding. However, for larger disposals, a gain or loss can arise. To calculate whether the disposal is small, and the gain if it is not, the application needs to know the ‘market value of the remainder’, i.e. the market value of the holdings retained after the cash distribution. This is measured on the first day of dealing after the event. In Trust Accounts the user may either enter the market value of the remainder directly into the market value field or alternatively may enter the share price into the first day value field. In the latter case, the application multiplies the first day value by the holding to calculate the market value. The application does not store the first day value field. The first day value field is not always useful. For instance, if there is a takeover then multiplying the first day value (of the successor security) by the holding (of the parent security) does not give the market value of the remainder. In these cases, enter the market value directly. |
|
Rule Code, Accounting treatment |
Each entry stores its CGT Rule Code and accounting treatment. They are initially derived from the entry’s movement code. However, the entry keeps a copy of them in case the movement code is subsequently edited or even deleted. These fields cannot be edited. |
|
Accrued inc |
This button is available for acquisitions and disposals of fixed interest stocks that have Accrued Income Scheme ticked on the investment account. It is used to edit the accrued income scheme charge or allowance. |
|
Holdover |
It is used to record any holdover or deferred gain on the entry. |
How to enter Property entries
To enter Property details, first the asset needs to be held in the client’s investment ledger, through the Investment Ledger tab (see Investment ledger section). Once entered from the Data Entry option select Property Entries and complete the Add Property Entries window.

|
Movement code |
F2 to enter the movement code, select from the drop-down list. A code can be entered directly without using the F2 key. |
|
Date |
Enter the date of the transaction. |
|
Ref |
Enter a reference for the posting if required. |
|
Investment |
F2 to select the property from the drop-down list. Note: If a property not available, it can be added at this point. |
|
Units |
Enter, usually 1. |
|
Description |
A default description appears but can be amended. |
|
Amount |
Enter the amount of the transaction. |
|
Logged-in a/c |
Amend the Logged-in account if necessary. This is usually a bank account or stockbrokers account unless you are posting historical data, in which case it should be the Suspense account. |
|
Analysis a/c |
The Analysis account defaults to the code that has been entered for the investment depending on the movement code used. |
|
Entry details may be added or else Close to enter the entry and Close again. |
|
Entering Dividends and Interest Received
There are different ways that dividends and interest received can be entered. The first method is by entering the dividend individually one at a time, and the second method is using the Autopost Routine.
Entering Dividends Individually
To enter a dividend into a client’s records, select Data Entry from the Client Menu and Investment Entries. The Add Investment Entries window appears.

As soon as an Investment is chosen from the drop-down list the application automatically completes the holding and the Description field, together with the Logged in account, Analysis account and the Journal Type.
|
Movement code |
F2 to enter the movement code, select from the drop-down list. A code can be entered directly without using the F2 key. |
|
Date |
Enter the date of the transaction. |
|
Ref |
Enter a reference for the posting if required. |
|
Investment/ Units / Description / Logged in a/c / Analysis a/c |
F2 to select the Investment; when the investment is chosen from the drop-down list the application automatically completes the holding and the Description field, together with the Logged in account, Analysis account and the Journal Type, and a window showing the last dividends is displayed |
|
Amount |
Enter the amount of the transaction. |
Click on Detail… to display the Posting Details window, add additional detail if required.

Entering Dividends using Autopost
The second method of entering dividends received is by using the Autopost routine. For the Autopost routine to work, the securities database needs to be kept up to date with all the share transactions that have taken place over the period. Autopost looks at the securities that a client has and applies the entries from the Security Database to the history of the security in the client.
To run the Autopost routine, ensure that you are within the client record and select Autopost from the Investment Ledger tab.
The Autopost Assumed Dividends, Interest, Bonus, Rights window appears.

The reference field is used as the Reference for all transactions generated by the Autopost. It could be used for recording the initials of the person who ran the Autopost and generated the entries.
(i) On the Conditions tab, the posting dates default to those set in the database parameters. They may be amended if necessary.
(ii) Ensure the Journal types for both UK Tax and Foreign Tax are correct.
(iii) From the Funds tab, highlight the fund that you want to post to and then select the Securities tab.
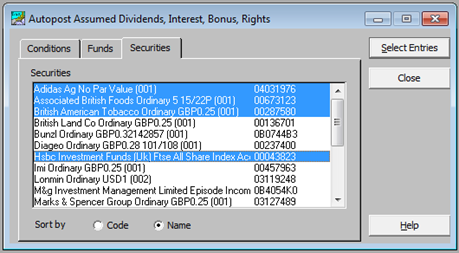
Select any or all of the securities from the list showing. Those selected are examined for automatic posting of income and capital items. Click on Select Entries. The Autopost Entitlements will be selected, and progress is shown in a pop-up window.
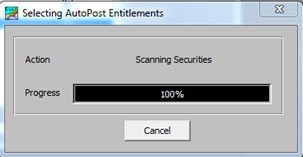
When it reaches 100% a window similar to the following one appears.

Each of the securities selected for auto posting can be highlighted in the security drop-down list.

(iv) The opening balance for the highlighted security is shown. The white boxes below show details in relation to the highlighted line in the lower section of the window.
(v) The lower section of the window contains all the events found in the security database during the period chosen.
(vi) A tick indicates the items which will Autopost. Choices may be made at this stage by ticking other items.
(vii) The Reset button returns all posting selections to the original settings.
(viii) The Review button opens a window allowing you to review the posting decisions. Ticks may be moved, and the resultant changes viewed in the window.
(ix) Clicking the Autopost button takes you into a schedule of the actual postings. If required a hard copy may be printed. The entries selected for posting now appear in the clients funds.