User Guide - ePay

Stripe Setup
Stripe is the Payment Service Provider (PSP) that will be dealing with payments within ePay.
Before setting up ePay within CCH Central, you will need to create a Stripe account.
If you already have a Stripe account, you can login with your existing credentials.
Stripe Dashboard
Fill out your business profile to accept payments on your Stripe account Activate your account – New Business – Stripe
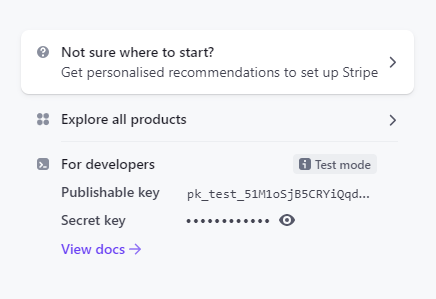
API Keys
During the setup within CCH Central, you will need to enter 2 API keys. These can be found on your Stripe dashboard once you have registered.
Payments & Transaction fees
All payments and transaction fees will be dealt with by the PSP (Stripe)
You will receive funds net of fees. Stripe provides reports which itemise the details of gross amount vs. transaction fees & net amount.
ePay Setup
Note: ePay is only available using the standard Billing Wizard routine. Billing using Bulk Bill Extra fields currently does not support ePay and is to be reviewed at a future date depending on demand.
Note: The ePay feature is not supported for multicurrency sites.
Configuration Key
To activate ePay, a configuration key is required.
Navigate to File > Maintenance > User Defined > Configuration and set the Key Value for the following configuration key PM_ePay_ID = 1. Save and exit CCH Central.
Note: For Practices not wishing to use ePay, leave the PM_ePay_ID key value set to 0 (this is the default setting)
Attaching a PSP provider
Once ePay has been activated by adding the configuration key above, the PSP provider needs to be associated with an organisation (Company Name).
Navigate to File > Maintenance > Internal > Companies to complete the setup.
Right-click within the company's grid and select Show File Chooser. Add the following three fields onto the grid:
- ePay
- PSP Setting
- PSP
ePay - This shows whether the company is available for activation.
- Click the Enable link to start the activation process
- Click the Disable click to remove the ePay activation
PSP Setting - This is where the PSP details are entered.
PSP - This shows the provider's name
Once the Enable link has been selected from the ePay column, a 'Click for Settings' link becomes available. Click this link to open the PSP details browser window.
Entering PSP Details
Click the Settings button to enter the API values that are shown in your Stripe account.
It is very important that the Publishable Key and Secret Key are copied and pasted separately. You are only allowed to copy the Secret Key once. You are, however, able to regenerate a new key (called Roll key) if the Secret Key did not copy correctly.
Click Verify to ensure that the information has been entered correctly. Once the 'Not verified' changes to , click the Submit button to continue. The following is shown to advise that everything has now been configured.
Merchant Setup
Within this window, there are two sub-options (Display Name + Contact Information). Within Display Name, you can customise the payment pages that are displayed to your clients during the payment process. Here you can add a Company Logo image, a display name, or even both (including any additional text to be inserted below the logo). Once all the items have been entered, click the Submit button to save the updates. Click the for a preview of what your clients will see.
Close the browser window to return to the Merchant Setup option. Click the Contact Information option to enter information that will appear on the payment receipts. Once all the items have been entered, click the Submit button to save the updates. Click the for a preview of what your clients will see.
Close the browser window to return to the Merchant Setup option, and close the PSP Details browser. Navigate back to CCH Central and re-access the Companies window. Click the 'Click to Refresh' option to update the PSP to read Stripe.
If this step is missed, then an error will appear when posting bills for this Company.
Adding the merge field to bill template
The ePay link needs to be added to your bill template/(s). It is recommended to add an additional template with the ePay link embedded and use that template for your clients who are set to pay via this link.
Right-click and Open the copied template. Select Insert > Quick Parts > Field > Merge Field
Under Field Name enter – EPayLink, click OK
Note: Entry of Field name is case sensitive
Save the bill template.
Navigate to File > Maintenance > Documents > Document Styles and add the new template i.e: Client Bill / RFP. Make the new template available for the company/office within File > Maintenance > Documents > Document Styles Company and Office.
Raise the bill as normal and associate the new style at Stage 3 of the billing wizard.
Note: The ePay link is accessible when the invoice is emailed or published to CCH OneClick
The ePay link is not generated where the invoice is posted with either a zero or negative value.
Accessing the link
Once the bill has been raised, the field is displayed as below:
Note: Currently the 'Click here to pay' font only displays as Times New Roman size 11
The client will need to click the link to open the payment link. They will be presented with something similar to below:
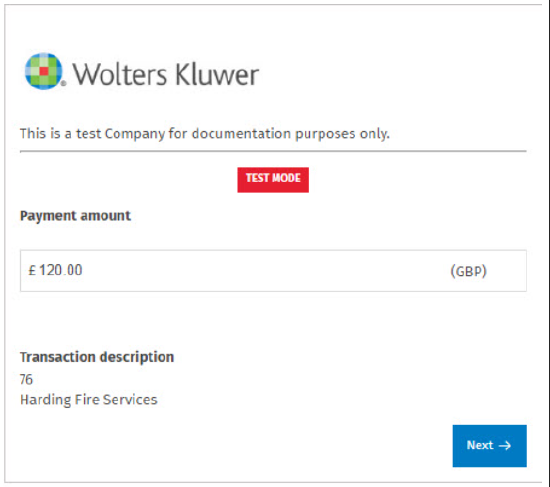
When they click the next button, they will be re-directed to the Stripe payment site for a payment to be made.
The payment will appear on your bank statement and Receipt entry will be required within CCH Practice Management.
Payment link expiry
A new configuration key has been added which allows Practices to set the expiry duration of the payment link. Currently, the default is set at 30 days. To increase/decrease the length, change the Key Value set against the PM_ePayPaymentExpiry key name. Save and exit the application for changes to take effect.
When your client clicks the link to make a payment beyond the value set (within the Key Value), the message 'We are unable to process the payment' is shown.
Note: The expiry date displayed is set in American format