The Bill Paragraphs window

Customise Bill
In the Billing Main page, clicking the Bill Paragraphs button,  to open the the Bill Paragraphs page. If you are using the Billing Wizard this page will automatically come up when you click Next in Stage Three
Within the Bill Paragraphs page there are a number of options for defining the way an invoice will look. You can:
-
change the Print Line Detail list selection

-
use 'Master Paragraphs' to add predefined text to the bill
-
add the content of a previous bill using the Posted Bills window
-
enter or edit billing paragraph text directly by typing in the edit field
-
format the text using the formatting options on the toolbar. All the usual options are available so you can amend colour and font or apply bolding, italics or underlining.
Note: remember, if you want to change the overall look of the invoice, you can change the 'template' being used by selecting a different one from the Style list box in the Billing Main window.
Bill Paragraph options
|
Field |
Description |
|
Formatting toolbar |
Use the options on this toolbar to apply formatting to the selected text in the edit field. |
|
Billing Paragraphs area |
This is where you can view the included paragraphs, their order, and the amounts allocated against each paragraph as they will be displayed in the invoice. Type directly into the Amount and Tax column. You can drag the column headings to put them in a different order. The column width can be amended by clicking and dragging the column dividers with the mouse. |
|
Edit field |
The bottom half of the page contains the edit area where you can type text to appear on the bill, or make changes to existing billing paragraphs. Select a billing paragraph in the list to display its contents in the edit area. This is where you apply formatting to the bill text. |
|
Right–click menu
|
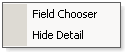
A right–click menu is available on the page. It contains two options:
|
|
Print Line Detail |
The four list boxes allow you to determine the amount of detail displayed for the various transactions you are billing. For each transactions type you can choose from the following options:
|
|
|
The Users Total and Actual (Required) Total amounts in this page must match before you can proceed with billing. If the totals do not match you will see this icon. The icon will disappear once the two totals match. These total fields are just for display. You cannot edit the amounts in them. To make the totals match you need to amend the amounts against the individual billing paragraphs. TIP You can highlight an amount and then double–click it to automatically adjust the selected amount so that it creates the correct total required for the bill. |
|
|
If you are billing at the client level (that is, from the Bills tab on the Client page) this will read This Client. If you are billing at the assignment level (that is, from the Bills tab on the Assignment page) this will read This Assignment. Click to access the Posted Bills window from where you can view the billing paragraphs used in previous bills and copy them into the current draft bill. See the topic Copying text from other bills for more information. |
|
|
If you are billing at the client level (that is, from the Bills tab on the Client page) this will read Other Client. If you are billing at the assignment level (that is, from the Bills tab on the Assignment page) this will read Other Assignment. Click to access the Posted Bills window from where you can view the billing paragraphs used in previous bills and copy them into the current draft bill. See the topic Copying text from other bills for more information. |
|
|
Click to move the selected billing paragraph line up the list. |
|
|
Click to move the selected billing paragraph line down the list. |
|
|
Click to access the Master Paragraphs window from where you can drag paragraphs onto the Bill Paragraphs page to add them to the bill. You can amend them if required using the edit field. |
|
|
If you want to remove your edits (either the text or default amounts,) you can click the Re–generate Bill lines button to reset the content to the default text and amounts. The Regenerate Print Lines message will appear. Click Yes to return to the default text for all paragraphs. |
|
|
Click to add a new empty paragraph. Select the existing paragraph line that you want to precede the new line, then click the Add button. The new blank line will be added below the selected line. |
|
|
Deletes the selected paragraph. |


Other options
There are addtional options to consider within this stage of the billing process. Users can select a delivery method for the bill and choose the relevant Style (if more than one is available):

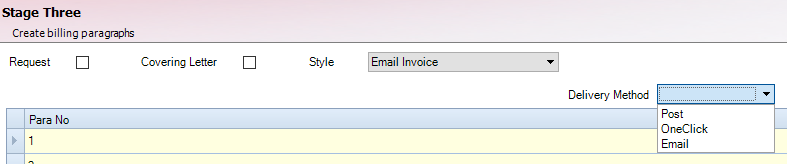
The Delivery Method is populated by default with the value of the Delivery Method set on the assignment on which the bill amount was entered in Stage One of Billing Wizard.
If the bill amount is entered against multiple assignments that have the same Delivery Method value, then the Delivery Method from Stage Three of Billing Wizard will be populated with the value of the Delivery Method set on the assignments.
If the bill amount is entered against multiple assignments that have different Delivery Method values, then the Delivery Method from the Stage Three of Billing Wizard will be blank.
Delivery Method availablity
The Delivery Method field is available within the following windows:
- Client > Bills Tab
- Billing > Draft Bills
- Billing > Bills Ready to Print
- Billing > VAT Invoices to Print
- Billing > VAT Invoice History
- Billing > Billing History
- Billing > Billing History by Partner
Ability to lock down delivery method
A Task Permission is available to enable practices the ability to lock down who can add a Delivery Method. The new task permission applies to the following areas:
- Client > Assignments > WIP Tab
- Assignment Templates > Billing Tab
- Billing > Draft Bills > Open Draft No > Master Paragraphs
- Find Assignments > Bulk update
The Task Permission is located within File> Maintenance > Security > Task Permissions.
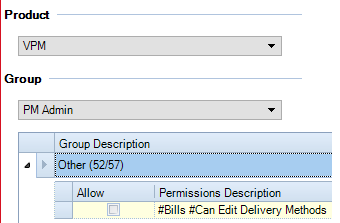
If a user does not have the permission set, they are unable to set Delivery Methods.