Authorising and posting a bill

Authorise and post an individual bill from the Billing Main window
Bills can be authorised individually as they are submitted within the Billing Main window, or you can use the batch authorisation function available on the Home Page for authorising multiple bills in one go.
NOTE
In order to authorise and post bills from the Home Page you need to have the Bills window displayed. See the Home Page topic if you need to know how to display the Bills window.
NOTE
If you are using the Billing Wizard, you can authorise and post a bill in the Stage Four window. Follow the instructions below from step 4.
-
Open the Client page or the client Assignment page for the required client and then click the Bills tab of the Client or Assignment page.
-
Double–click the submitted draft bill you want to authorise in the Draft Bills list (the Entry Status column will tell you if the bill has been submitted or whether it is still in draft).
-
In the Billing Main window, click the Authorise a Submitted Bill button,
 .
. -
In the Select Employee window, select your name from the list to identify yourself as responsible for authorising the bill, then click OK. By default the current user is selected.
Once a bill has been authorised, the authorisation status will change from ‘Unseen’ to green ‘Authorised’ and the responsible employee's name will be displayed next to this.

-
Click the Post button and then click Yes on the Posting prompt to post the bill.
The Bills Ready to Print window is displayed.
This will list all posted bills that haven't yet been printed. -
Click OK to close the window.
The client's Bills tab will display, with the posted bill listed in the Full Billing History list.
Batch authorise and post bills from the Home Page
-
Click the Home Page option from the Toolbar.
-
If you only want to view bills for a specific client partner, select the Partner check box and type the name of the required partner over the 'All' or current partner name.

To view all unposted bills leave the Partner check box unselected
- In the Bills window, select the check box next to all the bills you want to authorise or post. Only those items which are selected will be affected by any actions you perform.
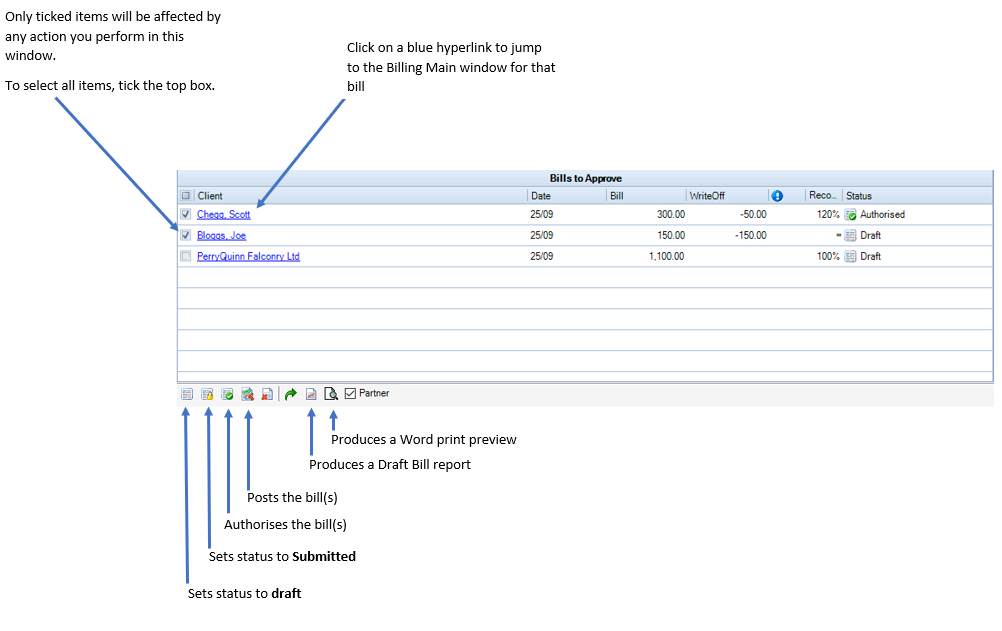
NOTE
A bill has to have the status of 'Submitted' before it can be authorised. Any bills selected for authorisation which are still draft will remain as draft.
-
Click the Approve button

All selected bills will now be marked as 'Authorised'. -
Click the Post button

The posted bills will be removed from the list.
You can now print the posted bills by selecting the Billing tab from the top of the screen, and then Bills Ready to Send

