Allocating amounts in a bill

The Bill Amounts window
The Bill Amounts window is where you allocate the amount to bill the client. On this window you can view and allocate the client's WIP against specific assignments, employees, tasks, or time and expense entries.
If you do not want to bill the client the exact value of WIP entered against them in the system, there are four types of WIP adjustments you can make from within the Bill Amounts window:
- write–off
- write–on/up
- Miscellaneous Charge
- Estimate to Complete
Note: for detailed information on the options available in this window, see The Bill Amounts window before allocating WIP.
Allocate WIP amounts to be billed
-
Open the Bill Amounts page from either the Billing Main window by clicking on the Bill Amounts
 button, or if you are using the Billing Wizard, click Next on the Stage One window.
 -
Drill down to the required level ready to allocate the WIP.
Do this by grouping the transactions or clicking on WIP items in the list to drill down into them. For example, if you only want to bill the work carried out by one employee, drag the Employee column header to the grouping area so the WIP items will display each employee and the WIP total against them for the client.
The text above the WIP items will always tell you where you are when drilling into the information, for example if you group by client, assignment and employee, then drill into one of the employees to view the individual transactions, you would see 'ABC Media > ABC Media/Accounts2004 (ABC/AA) > Jane Parry > Transactions'.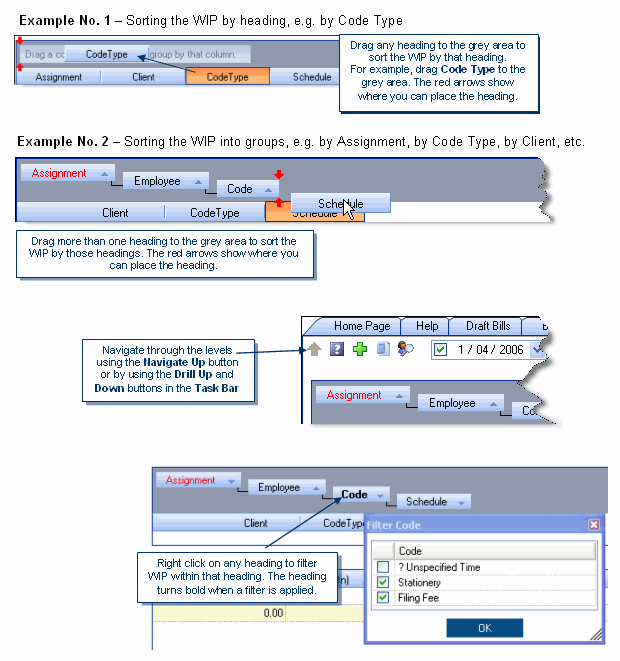
-
Click in the yellow Bill column against the WIP item you want to allocate for billing, and type the amount to be billed for the item. If you want to bill the entire WIP amount against the item, double–click in the field and the amount will be entered automatically. You can also press the [Space] bar on your keyboard whilst in the Bill field to default to the total WIP amount.
As you enter the WIP amounts the totals fields at the bottom of the page will update.

Note: if you enter an amount in the bill field other than the full WIP amount, the remaining unallocated WIP will be carried forward to be allocated to the next bill.
-
To write on or off WIP, enter the write up or off amount in the Write–Off (On) field against the required WIP item.
As with billing WIP, you can enter write on or write off amounts against the total bill amount, or against specific assignments, employees, or time, expense or transaction items.
The system will automatically calculate the write–off or write–on amount based on the difference between the WIP amount and the amount typed into the Bill field.
- If the bill amount is greater than the WIP balance on the assignment, the write–on amount will be automatically calculated.
- If the bill amount is less than the WIP balance on the assignment and you want to write–off some or all of the remaining WIP, click the Write–Off (On) field and enter the amount you wish to write–off. Otherwise, the WIP will be carried forward.
Write–offs are entered as positive amounts and write–ons are entered as negative amounts. The system will automatically display negative amounts (that is, write–ons) in parentheses. For example –100 will be formatted to appear as (100.00). The system will colour write–off amounts in red.
Note: the system works on a ‘First In First Out’ basis when allocating against the total billed amount. For more control over the allocations, drill down into the various WIP levels within an assignment and make the allocations at that level.
-
Click the Create Miscellaneous Charge button
 to add a miscellaneous charge to the bill. See Adding a miscellaneous charge to a bill for instructions.
 -
Click the Create Estimate button
 to add an estimated amount to the bill.
 -
Click OK to close the page.
You are now ready to enter the billing address and check other details in the Bill Address window. -
Click the Bill Address button
 on the Billing Main page.
If you are using the Billing Wizard, the next step after Stage Two is Stage Three – Creating Billing Paragraphs, with the address details coming at Stage Four of the wizard.