Bundle 'Contents'


Interaction with Layout and Formatting Window
The values of the following check boxes are initially set on the values with the Layout and formatting window:
- Return declaration.
- Duplicate signature page.
- Include copy declaration text on front page of form.
The first two options can be amended on the Contents tab provided the corresponding options have not been suppressed in the Layout and formatting window.
The Layout and Formatting window is accessed via File > Maintenance > Tax settings > Personal tax > Layout and formatting.
Setting up a Bundle
The Contents tab appears as follows:

- Select the Bundle name from the drop down in the Bundle section.
- Select the Type (SA100 or R40) from the Type drop down in the Tax return section. The drop down defaults to SA100. If the Type is changed to R40 then the Print IR mark check box is greyed out and disabled (as R40 Tax Returns cannot be filed online).;
- By default the Include check boxes for the following sections are ticked:
- Tax return contents.
- Computations.
- Backing Schedules.
- By default the Order drop down is set as in the image above.
- The Include check box for the CGT schedule of realised gains will only be available if CCH CGT and Dividend Scheduling is licensed and installed in the same folder as Central / Personal Tax.
- If the Include check box is ticked for a given section then that section will be selected for inclusion in the bundle and the remaining controls in that section will be editable. The Order number will default to None and you should select the appropriate Order number.
Storing a Bundle

Click on the drop down and select Folder. An error icon appears next to the ellipsis button until the Path is selected:

Click on the ellipsis button to open the Browse for Folder
Select the folder and click on OK to populate the Path.

The Path will be stored in the database.
Including the Schedule of Realised Gains
The CGT Schedule of realised gains can only be included in the bundle where CCH CGT and Dividend Scheduling is installed along side Central and Personal Tax. If CCH CGT and Dividend Scheduling is not installed then the Include check box for CGT Schedule of Realised Gains will be greyed out and disabled.
Where CCH Gains.net is installed then tick the Include check box and set the Order to enable the CGT Schedule of realised gains to be included in the bundle:

Adding Attachments
Only PDF attachments can be added to the bundle.
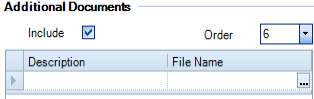
Set the Order number with a value between 1 and 6. If the Order number is not unique than an error icon is displayed next to the Order drop down:

You will not be able to save the data on this window if this error icon is present. If you try to do this then you will be presented with the following message box:

Enter the description of the document in the Description field. This description is displayed on the Tax Return bundle window within the client. Click on the Ellipsis button  next to the File Name field to open the Add Additional Document window. Select the document to attach. The name of the attached document is displayed in the File Name field. It is also mandatory to provide a description of the additional document.

Press Enter to include that document in the bundle and click Save.
Deleting Attachments
To delete a document highlight the row in the Additional Documents grid and press the Delete key:
Click Yes in the Delete message.
Adding a Letter template
To include a cover letter with the bundle, in the Letter template section tick either:
- Include in bundle to add the letter to the Adobe Acrobat document
- Output to Word to open the letter with MS Word. The letter is not included in the Adobe Acrobat bundle

When using the Include in bundle option, set the Order number. Click the Ellipsis button  to open the Add Letter Template window. Select the template and the name of the template is returned to the File name field:

To replace the template you can the click on the ellipsis button and select the new template.
If you want to delete the template click in to the File name field and press the Delete key:

Click Yes on the message.
If the Include check box is ticked but there is no entry in the File name field then an error icon will be displayed to the right of the Ellipsis button

You need to add the file name to correct the error or you will not be able to save the data on this window.
There are three mail merge fields that relate specifically to the Tax Return Bundle:
- CPGIssueDate
- CPGLetterParagraphs
- CPGLetterParagraphs1
These can be included in the letter template. The mail merge field CPGLetterParagraphs1 is designed to be used for paragraphs that are to appear in an Appendix. In this situation you would include a Page Break in the template and add the mail merge field on the new page.
NOTE: if you edit the letter template after creating the bundle, you will need to "refresh" this screen by clicking on the ellipsis and browsing to the template. Click Save and the bundle will be updated with the revised template.
Saving Changes
When you choose to save the changes, e.g. by clicking on the Save menu item in the Task Bar, then a message will appear:

Select Yes to push the changes down to all the associated client Tax Return Bundles. If you select No then the template will be updated but not the associated bundles.
If any client is open for a Tax Year that is linked to this bundle then it will not be possible to update that Tax Return Bundle and the following message box will appear:

Press OK to close the message.