Expat Employments

Important Note! This pertains to the CCH Personal Tax 2010.1 release.
Expat Employments
Setting up an Expat Employment
This is set up on the ‘Employments’ screen. Click on the hyperlink ‘Click here to create new employment’.

The ‘Type of employment’ screen opens. Where the Expat module has been licensed then the ‘Gross up employment?’ check box will appear on the screen to the right of the ‘Ordinary employment’ radio button.
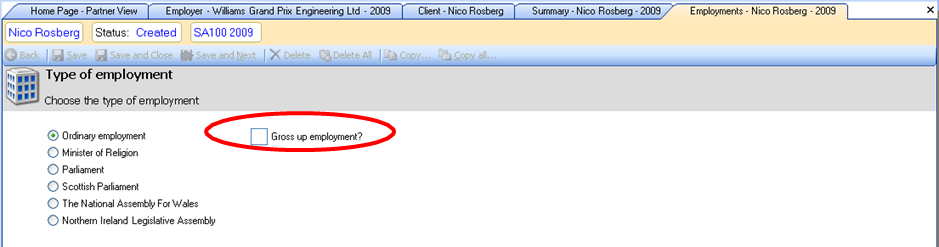
If the employment being created is an expat employment then tick the ‘Gross up employment?’ check box and click on the ‘Next >>’ button. The ‘Employer’s name’ screen appears. Type in part of the ‘Name of employer’.

Any Expat employers in the system, matching the details entered, appear in the grid below the fields. Click on the name of the employer you want to use.
The employer’s details populate the fields at the top of the screen.

It is possible to set up an Expat employment without having previously set up an Expat Employer. In this scenario no employer will appear in the grid. The employer (and the associated contact) will be created (but without any tax year data). Click on the ‘Next >>’ button to go to the ‘Input employer address’ screen.
This screen displays the employers address and lets you select an alternative address within the employer for that year.

If the employer did not previously exist in the database then you will see an alternative version of the screen that allows you to enter the address manually or to select an existing address:

When the address is correct click on the ‘Next >>’ button to open the ‘Employer details’ window.

Use these check boxes if they are appropriate. Click on the ‘Finish’ button to create the employment.
Employer tab
The ‘Employer’ tab is presented as follows:

The ‘Details of employer’ section is populated from the details held in the employer. The ‘Duties abroad’ radio button defaults to ‘Partly’ and is editable.
The ‘Gross up?’ check box is ticked but is not editable within the employment. This setting is only editable on the main ‘Employments’ screen.
Equalisation tab

As with the employer the ‘Equalisation Option’ is set on this screen. The options are:
- Full
- Employment only
- Specific
- None
‘Full’ equalisation is where all the employment and non-employment income and gains are included in the gross up and the employer get the benefit of all the allowances, deductions, rate bands etc.
‘Employment only’ equalisation is where only the employment income is included in the gross up calculation. Non personal income e.g. bank interest is excluded. The employer gets the benefit of the pension contributions to a registered overseas pension plan, personal allowances and the rate bands (including the extension of the rate bands) in the gross up calculation.
‘Specific’ equalisation is where the income, allowances, deductions to be included in the gross up are selected by the user. The template can be set up for a given employer. If this option is selected then the ‘Specific Equalisation’ tab becomes visible.
‘None’ is used where there is no gross up but the user wants the Expatriate Backing Schedules to show the split between UK and Non-UK duties.
The ‘Modified PAYE scheme’ check box should be ticked where the employer operates a Modified PAYE scheme and payments on account are not due. The ‘Equalisation option’ and ‘Modified PAYE scheme’ check box are populated based on the entries in the employer.
If there is no linked employer then the default ‘Equalisation option’ is ‘None’ and the ‘Modified PAYE scheme’ check box is not ticked. Both of these are editable on this screen.
'Cash Payments' tab

The ‘Remuneration Template’ is populated from the employer. If there is no tax year data in the employer the default currency is set to ‘Great Britain (GBP)’
This is editable by the user. You should note that it is not possible to change the order of the items on this screen. However the order can be set within the Employer, see the ‘Remuneration Template’ tab section.
The ‘Total sterling value’ field is the sum of the column ‘Sterling value’. The ‘Paid in foreign currency’ field is the sum of the amounts in the ‘Sterling’ column where the ‘Currency’ is not set to ‘Great Britain (GBP)’.
- The ‘Sterling value Box 3’ field is the sum of the amounts in the ‘Sterling’ column where the ‘Box 3 value’ check box is ticked.
- The ‘Sterling value Box 1’ field is calculated as the ‘Total sterling value’ less the value in the field ‘Sterling value Box 3’.
- The figure in the ‘Gross up’ field is calculated in real time by the system.
- The ‘Total income’ field is the sum of the ‘Sterling value Box 1’ field and the ‘Gross up’ field.
The module makes the following assumption on who pays the UK tax deducted through PAYE. Where the ‘Equalisation option’ is set to ‘Full’ or ‘Employment only’ then the employer is assumed to pay the UK tax. Where the ‘Equalisation option’ is set to ‘Specific’ or ‘None’ then the employee is assumed to pay the UK tax.
Where the ‘Equalisation option’ is set to ‘Specific’ then the field ‘UK tax taken off paid by employer’ is enabled and is used to enter the amount of the ‘UK tax taken off’ which is paid by the employer rather than the employee.

This is used on the ‘Statement of liability’ report which shows the split of the liability between the employer(s) and the employee.
'Benefits and expenses’ tab

This is the same as the screen in an ordinary employment.
'Lump Sums’ tab

This is the same as the screen in an ordinary employment.
'Student Loans’ tab

This is the same as the screen in an ordinary employment.
'Allocation Periods’ tab

This is a new screen. The ‘Income’ is calculated as ‘Total sterling value’ from the ‘Cash Payments’ tab plus benefits in kind less expenses (including corresponding payments) plus Lump Sums Box 3. The ‘Alternative Description’ field is editable and is used in the backing schedule reports, whereas the ‘Description’ field is not editable.

The ‘Time apportioned’ check box determines which sub-screen is used to calculate the ‘Foreign earnings not taxable’. A tick in the box means that the income can be time apportioned between UK and non-UK duties. Clicking on the hyperlink will take you to the appropriate detail level screen.
To add another allocation period click into the ‘Description’ field in the first blank row. The allocation periods, with the exception of the first row, can be re-ordered using the ‘Move up’ and ‘Move down’ buttons.

When income is entered against the second and subsequent allocation periods then the income relating to the first allocation period is recalculated (and is in effect a balancing item).
When you click on a hyperlink, and the ‘Time Apportioned’ check box is ticked, then you will be taken to the ‘Allocable on a time apportionment basis’ sub screen.

The entries in the top section of the screen are populated from the ‘Residence, Remittance Basis etc.’ and the employment screens. For the first row in the ‘Allocation Periods’ screen they are not editable. For all other rows they are.
There are rules built into the system to determine the amount of the ‘Actual overseas element’ and to enable the fields:
- ‘Days worked outside UK’ and
- ‘Total days worked during period’
For example, where the taxpayer is resident in the UK, not ordinarily resident in the UK, claiming the remittance basis of taxation and the duties are performed partly abroad.
Where the user does not want not use workdays to apportion the income then the amount should be entered in the ‘Overseas element (override)’ field. To return to the ‘Allocation Periods’ screen click on the ‘Back’ button in the menu bar.
When you click on a hyperlink, and the ‘Time Apportioned’ check box is not ticked, then you will be taken to the ‘Not allocable on a time apportionment basis’ detail screen.

Enter the income relating to the non-UK duties in the field ‘Overseas duties element of income not allocable on a time apportionment basis’. To return to the ‘Allocation Periods’ screen click on the ‘Back’ button in the menu bar.

The default assumption for the ‘Remittances’ section is that all the income relating to non-UK duties is paid and kept outside of the UK (Assume Case III amount remaining outside UK).
To change this option select either of the following:
- Calculate exact remittance, or
- Enter amount not remitted.
Where the option ‘Enter amount not remitted’ is selected then enter the amount of income paid abroad and kept outside of the UK in the field ‘Amount not remitted’.
The ‘Calculate exact remittance’ option makes the following assumptions:
- All the ‘Sterling equivalent of foreign currency’ are paid and kept outside the UK;
- All the ‘Amount paid in Sterling’ are paid in the UK;
- All the Benefits in Kind are paid in the UK.
The fields ‘Amount paid abroad but remitted’ and ‘Non-UK Benefits’ can be used to override these assumptions.
'Overseas Matters’ tab

This is a cut down version of the screen in the ordinary employment. The major change is the addition of the following fields:
- ‘Foreign tax credit override (gross up only)’ and
- ‘Foreign tax credit override for CGT(gross up only)’
These are used to override the ‘Foreign tax credit’ on income and capital gains in the gross up calculation.
'Specific Equalisation’ tab

The ‘Specific Equalisation’ tab becomes active if the ‘Equalisation option’ for that employment is set to ‘Specific’. The screen uses a tree structure. The group headings, by default, sum the amounts in the detail child records below it in the same column. The detail for the ‘Compensation’ group comes from the ‘Cash payments’ screen.
The figures in the ‘Taxable amount’ column come from the appropriate data entry screens, rounded as per the HMRC Computation except where there are multiple employments, of least one of which is equalised, in which case they come from the ‘Multiple Employer Allocation’ screen.
The group header rows e.g. ‘Compensation’ are identified by being in a bold font and having a button to the left of them.
To expand a particular group click on the + button in front of the ‘Description’. To collapse a group click on the – button in front of the ‘Description’.
It is possible to fully expand the tree structure by right clicking anywhere on the screen and selecting ‘Expand All’ from the right click menu. Similarly it is possible to completely collapse the tree structure by right clicking anywhere on the screen and selecting ‘Collapse All’ from the right click menu.
The functionality of the ‘Include in gross up?’ flag follows a top down approach as follows:
- When the ‘Include in gross up?’ flag for a group heading is set to ‘Yes’ then the flags for the members of that group are also set to ‘Yes’.
- When the ‘Include in gross up?’ flag for a group heading is set to ‘No’ then the flags for the members of that group are also set to ‘No’.
- If the row forms part of the sub-group of another group then the ‘Include in gross up?’ flag can be changed from ‘Yes’ to ‘No’, and vice versa, regardless of the value of the ‘Include in gross up?’ flag for the parent of the group.
- Where some members of a group have their ‘Include in gross up?’ flag set to ‘Yes’ and others have theirs set to ‘No’ (or ‘Partial’) then the system will set the ‘Include in gross up?’ flag for the parent of the group to ‘Partial’.
- The functionality of the ‘Amount to be grossed up’ and ‘Amount not to be grossed up’ columns is as follows:
- ·Where the ‘Include in gross up?’ flag for a row (excluding a group header) is set to ‘Yes’ then the amount in the ‘Taxable Amount’ column goes to the ‘Amount to be grossed up’ column. The user can override the amount in the ‘Amount to be grossed up’ column and the balance will go to the ‘Amount not to be grossed up’ column.
- Where the ‘Include in gross up?’ flag for a row (excluding a group header) is set to ‘No’ then the amount in the ‘Taxable Amount’ column goes to the ‘Amount not to be grossed up’ column. It is not possible to override the amount in the ‘Amount not to be grossed up’ column.
Where the user enters a figure in the ‘Amount to be grossed up’ column then they are entering an override. It is possible to remove individual overrides or to remove all the overrides on the screen.
To remove all the overrides, and reset the values in the ‘Amount to be grossed up’ column based on the ‘Include in gross up?’ flag right, click anywhere on the screen and select ‘Reset all overrides’ from the right-click menu.
A message box will appear:

Clicking on the ‘Yes’ button will close the message box and remove all the overrides entered on the screen.
To remove an individual override click into the ‘Amount not to be grossed up’ column for that row, right click in the cell and select ‘Clear override for <description>’. This will immediately remove the selected override.
There is inbuilt validation so that if the entry in the ‘Amount to be grossed up’ column is greater than the amount in the ‘Total’ column for that row then a yellow warning icon is displayed and the font colour changes to red.
Any changes in the figures in the ‘Amount to be grossed up’ and ‘Amount not to be grossed up’ columns for a detail row will update the calculations for the group header row.
For the rows ‘Personal allowances’ and ‘Rate bands’ the amounts are automatically re-allocated between the ‘Amount to be grossed up’ and the ‘Amount not to be grossed up’ columns where
there is insufficient income in that column to fully utilise the amount. Any unused excess will go to the ‘Amount not to be grossed up’ column.
The first row in the ‘Compensation inc Above, App. For Non-UK Duties’ group, in the screen shot below this is ‘Net earnings relating to current year’, is a balancing row. This ensures that were there is only one allocation period the system will automatically calculate the split of the non taxable earnings relating to non-UK duties between the ‘Amount to be grossed up’ column and the ‘Amount not to be grossed up’ column.
Where there is more than one allocation period then the user will have to identify the split of the income, for the second and subsequent allocation periods, between the ‘Amount to be grossed up’ column and the ‘Amount not to be grossed up’ column. The system will again automatically calculate the split of the non taxable earnings relating to non-UK duties between the ‘Amount to be grossed up’ column and the ‘Amount not to be grossed up’ column for the first row in the group.
The user can override this split in both scenarios above. The cells with a grey background are not editable by the user.
Where additional compensation items or detailed benefits or expenses records are added after the ‘Specific Equalisation’ template has been set up then the value of the ‘Include in gross up?’ flag for the added item (child record) is based on the following:
- If the flag for the parent record is set to ‘Yes’ then set the flag for the child record to ‘Yes’ else
- If the flag for the parent record is set to ‘No’ or ‘Partial’ then set the flag for the child record to ‘No’.
'Multiple Employer Allocation’ tab
This screen becomes available when there are two or more employments, where at least one of them is an equalised employment and is used to allocate non-employment income, allowances etc. between the employments.

To access the ‘Multiple employer allocation’ screen click on the hyperlink ‘Click here to perform multiple employer allocation’.

The screen uses a tree structure. The group headings, by default, sum the amounts in the detail child records below it in the same column. The ‘Total’ column on the left hand side of the screen shows the total amount of the item being apportioned. The last Employment is used as a balancing item so it picks up the ‘Total’ less the amount(s) allocated to the remaining employment(s).
The ‘Employers’ names at the top of the screen are hyperlinks and when clicked on take the user to the ‘Employer’ tab for that employment. Where the employment started or ceased during the tax year then these dates are displayed after the employer’s name at the top of the screen.
The system deals with the following situations:
- Offshore contracts where only the UK contract is taxable in the UK and all the allowances, reliefs etc. are allocated to that employment (no employment end dates are entered).
- The taxpayer moves between employers during the year (employment end date(s) are entered).
If the ‘Date employment ceased’ fields are used, and there is one less entry than the number of employments, then the ‘Total’ amount for an item is allocated between the employments on a days ratio based on the entries in the employment ‘Date employment ceased’ fields.
If, however, the ‘Date employment ceased’ fields are not used then all of the non-employment income, allowances etc will be allocated to the first employment.
The figures for the final employment are the total figures for that item less any amounts calculated for the previous employment(s) i.e. it is a balancing item.
Whichever scenario applies you have the ability to override the calculated amounts. This is achieved by entering a figure in the ‘Override’ column for that employment. You will not be able to override the ‘Total’ column or the ‘Override’ column relating to the last employment as this is used as a balancing amount. It is possible to enter an override of zero (0.00). The cells with a grey background are not editable by the user whereas the cells with a yellow background are editable by the user.
It is possible to fully expand the tree structure by right clicking anywhere on the screen and selecting ‘Expand All’ from the right click menu. Similarly it is possible to completely collapse the tree structure by right clicking anywhere on the screen and selecting ‘Collapse All’ from the right click menu.
The system will perform the following validations:
- Validate that the ‘Override’ entry is not greater than the ‘Total’ amount of that item. If this applies then the following validation will not be performed;
- Validate that the calculated figure in the final / balancing column is not less that zero (this is relevant where there are at least 3 employments and at least one figure has been overridden).
Where one of these validations fail then a yellow warning icon is displayed and the font colour changes to red.
- To remove all the overrides on the screen right click anywhere on the screen and select ‘Reset all overrides’ from the right click menu. This will immediately remove all the overrides entered on the screen.
- To remove an individual override click into the ‘Amount not to be grossed up’ column for that row, right click in the cell and select ‘Clear override for <description>’. This will immediately remove the selected override.