Reporting

Payments on Account using CCH Central Reporting
Overview
CCH Personal Tax Payments on Account functionality uses CCH Central Reporting which enables a single report that can be used for both the January and July payments on account (called CCH Personal Tax – POA Report). This enables the supplied Standard Report and Letter templates for the January and July Payments on account to be modified each year as required.
The are a number of benefits behind this change, some of which are as follows:
- A single report is required and this no longer needs to be recreated each year; the reminder run can be created when it is convenient for you to do so without waiting for a release of CCH Personal Tax.
- It is easy to add additional searching and sorting criteria to the supplied report. We currently only include Partner as a filter but other fields can be added to your bespoke report.
- The letter templates can be updated to ensure your requirements are managed; additional fields included in your bespoke reports are now available within the updated mail merge fields.
The following notes assume a good working knowledge of both CCH Central and the CCH Mail Merge application; if you have not used the CCH Central Mail Merge previously, it is recommended that you read CCH Mail Merge.
Note: From a Best Practice perspective, we recommend that you do NOT amend the standard report or templates supplied, but you save them down under a new name and then make changes to those new reports/templates. If needed the original report and templates are then always available for reference. We also recommend that you save your amended reports and templates in the same location as those supplied by this release, but prefix them with the name of your practice, e.g. LoganandCo_CCH Personal Tax – POA Report, LoganandCo_January Payment on Account Letter etc.
As you will notice when you look at the new reports these are extremely complex using calculated fields. Although it is possible to add searching and sorting criteria for roles and responsibilities, please do NOT make any changes to the pre selected fields appearing in the reports otherwise the reports will cease to function correctly.
Letter Templates
Two new letter templates called January Payment on Account Letter.dotx and July Payment on Account.dotx have been added to the subfolder Templates within the deploy folder on your network. To check the location of the Deploy folder, right click on the Central shortcut and click Open File Location.
If you are unable to see the new templates, they may need to be moved to the path specified in File > Maintenance > Documents > Mailing Settings:
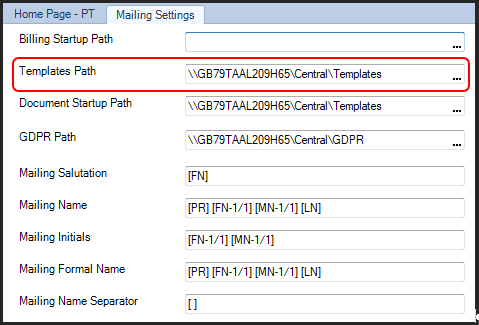
Note: The image left is for example purposes only. If a location already exists, do NOT change the path, but copy the template to the location specified. Please note that access to the mailing settings is controlled by task permissions. Please contact your system administrator if you need the templates need to moved to a different location.
Report Templates
The new report template CCH Personal Tax – POA Report has been added to the existing Payment on Account folder in Central Reporting:
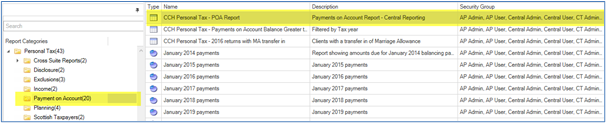
Note: This is for illustrative purposes only. You may not have all the subfolders shown above.
Producing the letter
From the main toolbar select Clients . Select New > Search from reports… from the New Search drop down

Select From Reporting then Category: Payment on Account and highlight the required report - CCH Personal Tax – POA report
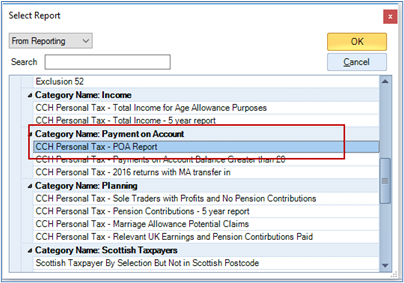
Click OK
Note: Pre defined filters are included as part of the report, all relevant clients are returned. We have automatically excluded closed clients, but this can be amended within the report itself.
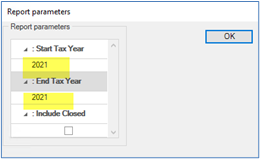
Where predefined filters are included in the reports, the existing Report parameters appear and are available for editing:

Note: When selecting the year always choose the year upon which the POA’s are based. E.g. for January and July 2024 the payments are based on the 2023 Tax Return .
If you require additional reporting filters we recommend that you open the new report and then save it under a new name and then make changes to your new report.
As you will notice when you look at the new reports this is extremely complex and uses calculated fields. Although it is possible to add searching and sorting criteria for roles and responsibilities, do NOT make any changes to the pre selected fields appearing in the report otherwise the report will cease to function correctly.
Select the clients to be included in the mail merge, either all clients or individually, by ticking the appropriate boxes. This selection can be further refined later if required.

From the ribbon bar select Mail/Email Merge:

Using the Mail Merge Wizard, from the Output Selection click Letters, Click Next
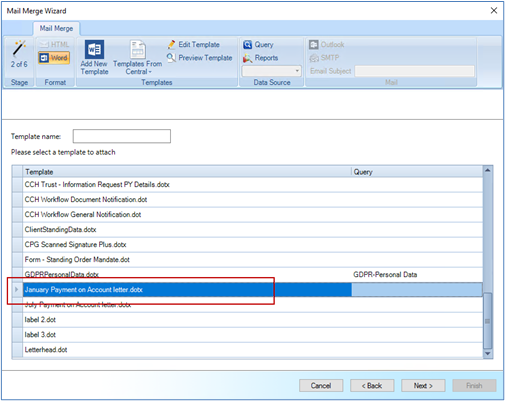
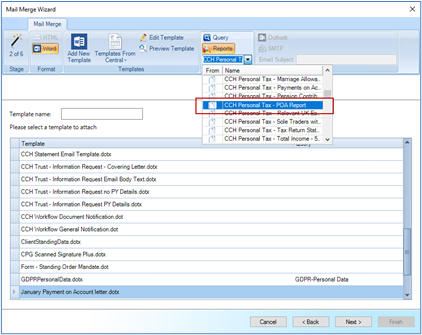
Select the letter template from the list and click Next
Note: If the letter template requires editing please see Hints and Tips Editing the Letter Template for New Fields where new fields have been added to the report that are required for inclusion in the letter.
Select the Team Responsibility and Associations as required and click Next
Select the clients to be included in the mail merge, either all clients or individually, by ticking the appropriate boxes.
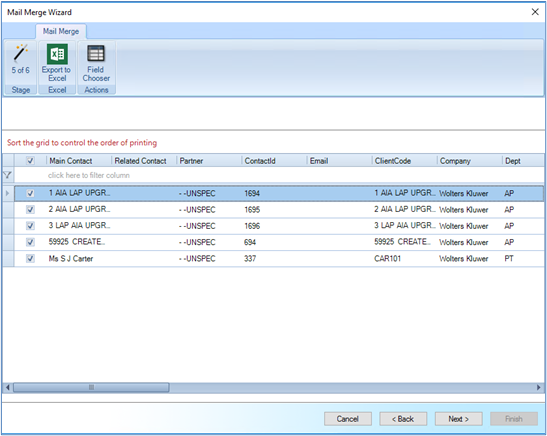
Click Next
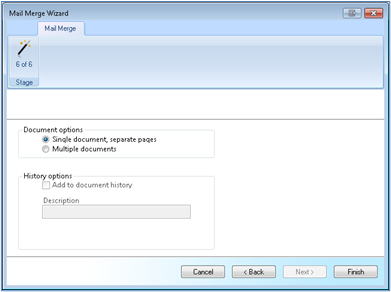
Select the output option: Single or Multiple documents and then click Finish to produce the letter
Example Letter

Hints and Tips
Batch refresh of Data
Important Note: The Batch refresh of Data must be run on the same tax year as the Report Parameter's.
Select File > Tools > Batch Update statement of account:
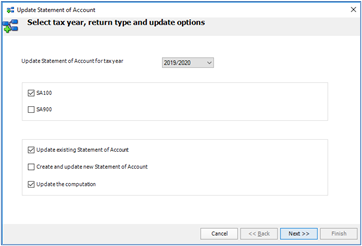
Select the tax year (e.g. for January/July 2024 select 2022/23) and the required return types, tick the third boxes only to update all existing records (optionally tick the first box if your firm uses the statement of Account). Click Next, set the filters required and follow the wizard. The latest figures appearing in the computation will then be used in the report.
Word templates
The Word templates are added to the Templates in the Deploy folder. The templates need to be copied to the location specified in the document creation settings if this is different.
From the menu bar select File > Maintenance > Documents > Mailing Settings
Copy the January Payment on Account Letter.dotx and July Payment on Account.dotx documents to the path specified in the Templates Path
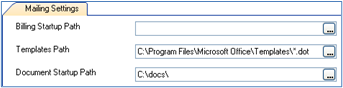
Note: If separate documents are to be printed, an entry MUST appear in the Document Startup Path .
Editing the Letter Template for New Fields
The letter templates as supplied are linked to the report templates, where new fields are added to the reports and these are required to be included in the letter for mail merge purposes, an update is required to the linking.
From the main toolbar select Clients
Select New > Search from reports… from the New Search drop down

Select From Reports then Category: Payment on Account and select your updated report:

Click OK
Note: Keep a note of the Report name as this is required later in the editing process.
Where predefined filters are included in the reports, the existing Report parameters appear and are available for editing:
Note: When selecting the year always choose the year upon which the POA’s are based. E.g. for January and July 2022 the payments are based on the 2021 Tax Return .
Amendments to the predefined reporting criteria are made here. If further parameters are required, the existing report needs to be updated.
Select the clients to be included in the mail merge, either all clients or individually, by ticking the appropriate boxes. This selection can be further refined later if required.

From the ribbon bar select Mail/Email Merge:

Using the Mail Merge Wizard, from the Output Selection click Letters, Click Next
Select the letter template from Data Source, Click Reports and select the required report from the drop down list
Note: The selected report MUST be the same as that selected when the clients were selected.
From the Templates group in the Ribbon, select Edit Template the template opens, the merge fields are then available for inclusion in the report:
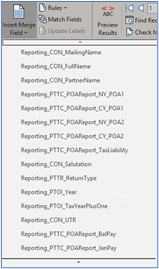
Note: The new fields added to the report appear near the bottom of the list and are prefixed with Reporting_, scroll down to the bottom using the downward arrow. When all the required fields have been added, remember to Save the updated document template with updated fields. Be careful not to select any fields that are prefixed Report_ as these reference a different query and will not return any values.
Report permissions
Security Group access can be separately defined for each report.
- Select the Reports icon
- Select the each report
- Click on the Security Group field
- Tick View for each Security Group needing access to the report
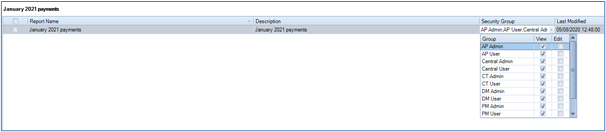
Note: Users also need access to Central Reports – In task permissions for Central check Reports also Reporting > #Reporting#Can Access
Note: Tax Explorer is a legacy reporting module for CCH Personal Tax.
Although it is still active for clients who have created standard reports in the past, we would suggest that you create new reports in CCH Reporting instead, as this is an integrated reporting tool.
About the Report View and Preview Tab Toolbar
When you preview a report the following toolbar appears.