CCH Interactive Checklist: Installing the software

Installation (local)
The following instructions are for carrying out a local installation on your computer. Please refer to the separate server installation instructions if you are going to carry out a server installation.
.Net Framework 4.0
CCH IC requires the Client Profile subset of the .Net framework 4.0 to be installed on your computer. If you do not have this, or the full version of .Net 4.0 installed, it will be installed for you.
SQL Server Express 2014
By default, the routines will install SQL Server Express 2014 and set up a local database to hold your checklist data. If you do not want it to do this, for example if you already have SQL server installed, you may remove the tick by this option. If you remove the tick, then you will need to create a new connection and database as described later in these instructions.
Note: that by leaving the option to install SQL ticked you are agreeing to the Microsoft standard Terms and Conditions for the use of SQL Server Express 2014.
Note: .Net Framework 3.5
SQL Server Express 2014 requires .Net 3.5 to be installed. If this is not present the installation of SQL will silently fail, and you will get a message that SQLCMD cannot be found. If this happens please install .Net 3.5 and re run the installation of CCH Interactive Checklist.
Installing the software
Note: Depending on your hardware and the options that are installed, the installation process can take from 5 to 30 minutes.
To install the software, run CCH Interactive Checklist Full installation V1.exe by selecting the downloaded ZIP file in C:\Temp and double clicking on the EXE file in Windows explorer.
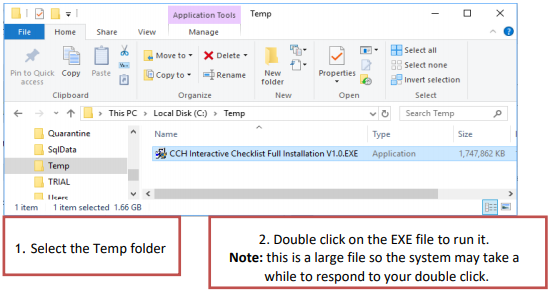
If you are presented with a User Access Control dialog, click on Yes. You will be presented with a series of dialogs as follows:


Note:The default directory in which the software will be installed on your local computer is C:\Program Files\CCH ProSystem\Interactive Checklist for 32 bit operating systems and, C:\Program Files (x86)\CCH ProSystem\Interactive Checklist for 64 bit systems.


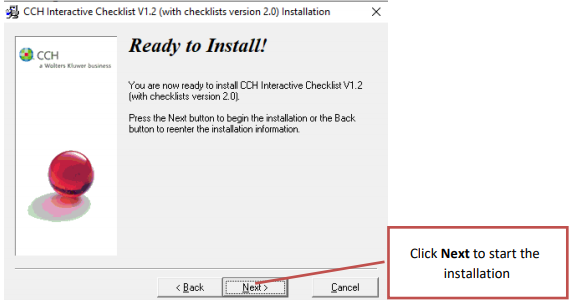
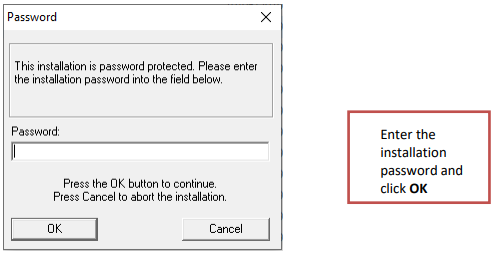
Installation of the .Net Framework (if option ticked above)
If this option was not ticked, then please skip to the next section on installing SQL Server Express.
If the .Net framework was selected, the following dialogs will appear. The process will vary depending on the operating system you are using but will be similar to the following which is for Windows 7.

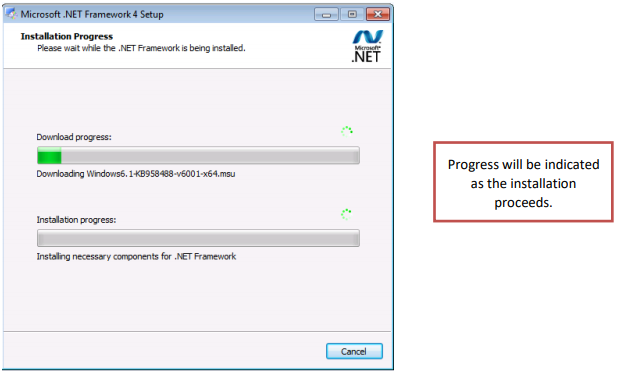

Installation Progress
The installation of SQL Server and CCH Interactive checklist will proceed without further user intervention and you will see a series of dialogs and progress bars appear as this happens.
SQL Server Express
If this option was ticked, you will the following dialog for several minutes.

You do not need to take any action, the dialogs will automatically close when the installation of SQL is complete.
The last action is for the system to install the CCH Interactive Checklist software and the latest versions of the checklists. During which the following dialog will be the only one shown on the screen:

On completion, the will display the Installation Complete message:

Launching the software
You can launch the software using one of the shortcuts provided:

Support
If you are experiencing difficulty and need assistance with installing the software, please contact our software support team via phone on 0344 561 8181.
Quick Start Guide
If you did not leave the option to install SQL Express ticked, you will need to manually create a connection and database. Please refer to the Appendix 1 for details of how to do this. The following assumes that you left the option to install SQL ticked and hence created a local database.
On loading the software, you will be presented with the Login dialog with the available connections listed. Initially this will show the connection to the checklists stored in your local database.

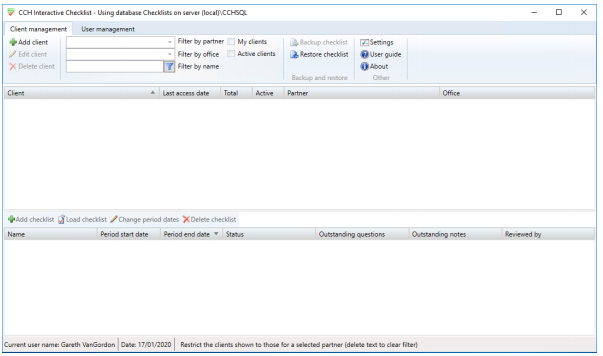
Creating your first client

Note: the lead partner and office entries are optional, however completing them will make it easier to find clients later on.
The client will appear in the client list displayed in the top grid:

Enter the name of the client, the lead partner and office and click OK.
To add a new client, select Add client from the Client management ribbon bar.
Creating your first checklist
Select the client by clicking on the name in the top grid and the Add checklist option in the dividing toolbar will become active.

The Add checklist dialog will appear and as this is the first checklist created for a client, the Select group field will be blank and the period start dates will both be set to the current date.

1. Select the type of checklist to be created from the Select group drop-down list. The checklist will be created and loaded for completion.

Click on Tailoring questions in the navigation area on the left to load and display the contents of the checklist on the right.

Click on a row in the checklist to move focus to the completion area and you can then navigate through the checklist using the up and down arrow keys and answer questions using the keyboard shortcuts shown in the answer panel that appears at the foot of the window.

Please refer to the user guide for more information about managing and completing checklists.
To close a checklist and return to the Client management display, select Close checklist from the ribbon bar: The Client management window will be displayed with the details of the new checklist created shown in the lower panel.

Double click on the name of the checklist to return to the Checklist completion window.
User guide
Full details of how to use the system and the functionality that it provides are contained in the user guide that can be downloaded from the website and is also available from the User Guide
option on the ribbon bar.

We strongly recommend that you read the user guide in full to ensure that you get the most from this new system.
Appendix 1 : Creating a connection and database
If you did not install SQL Express, you will need to manually create a connection and database the first time that you launch CCH Interactive Checklist. This can either be created on a network server so that all users have access to the same data, or you can create a local database if you have Microsoft SQL Server Express installed on your computer.
On launching the software, you will be presented with the Login dialog:

We recommend that you name the database “Checklist” so that it is easily identifiable by our support team should you need to seek assistance. The following
example will create a database called Checklist in the local instance of SQL Express:

Note that you will not be able to use the Test button as the database has not yet been created. Click OK and the systems will display the following question:

Note: If you see the following message when you try and create a new database or login it probably means that you do not have Mixed Authentication selected for your SQL instance.

Please refer to Appendix 2 for how to change this setting. Click on Yes and the connection and database will be created.
On returning to the Login dialog, the available connection will be listed:

Appendix 2 – Changing the access mode for SQL Server
CCH Interactive checklist requires the SQL server to be set for Mixed Mode access. If it is not set to this then you will see the following message when you try and log into the software:

If you see this message, you can check and change the access mode using SQL Server Management Studio as set out below.
If you do not have Management Studio installed, you can download this free of charge from the Microsoft website:
Link to download for Management Studio Express for SQL 2014
Checking and changing the access mode
Launch SQL Server Management Studio from the start menu


If you have changed the mode, you will see the following message:

You will need to restart the server for the change to become active and the easiest way to do this is to close down and restart the computer.
