Audit Notes

Audit notes can be entered at various stages during the course of the audit - entering test completion details, answering checklist questions, from the Audit documentation completion window and from the Audit notes window. Review notes can also be entered from the  button on the navigation window. When a note is entered it is recorded by the system as an uncleared note, and will remain in this state until it is cleared by the recipient. Uncleared notes are clearly flagged when you are reviewing audit programmes and checklists and are shown on the audit summary.
There is a way to reinstate notes that have been cleared. This can be used to reopen a note cleared in error, or where additional information requires the details of the note to be changed.
When you open a cleared note a [Reactivate note] button will appear if you are the person that cleared the note. Click on this and you will be asked to confirm that you wish to reactivate the note. If you indicate that you do, the following dialog will appear:

You are required to enter the reason why you are reactivating the note. Do this and click on [Store]. The note will be reopened and the system will now treat it as though it had never been cleared.
A record will be added to the audit trail showing:
o The original text of the note
o Original clearing comments
o Date originally cleared
o Who reactivated the note
o The reason for reinstatement
To review the audit notes, select [Notes] from the Reference menu and the Audit notes window will appear.
Deletion of individual note
On the Note action form dialog, the member of staff who raised a note can delete it at any time up to clearance. You can remove all reference to the note using the Delete note button.
Hyperlink from notes
A hyperlink to a working paper can be entered to enable the person who actions the note to have easy access to the original document.
To add a hyperlink simply enter the working paper reference between { }. E.g {F.05}
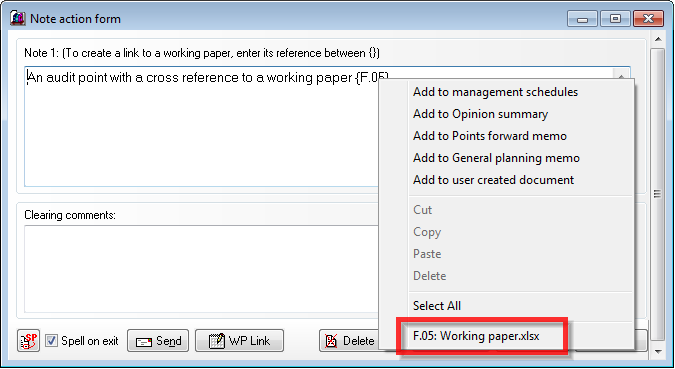
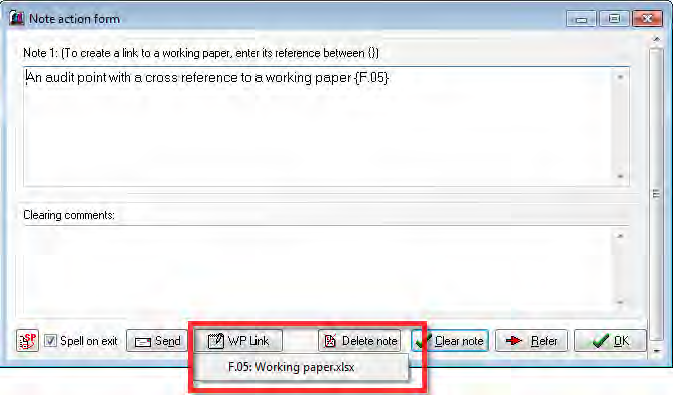
To view the hyperlinked working papers the user can right click or use the WP Link button and then select the working paper they wish to open.
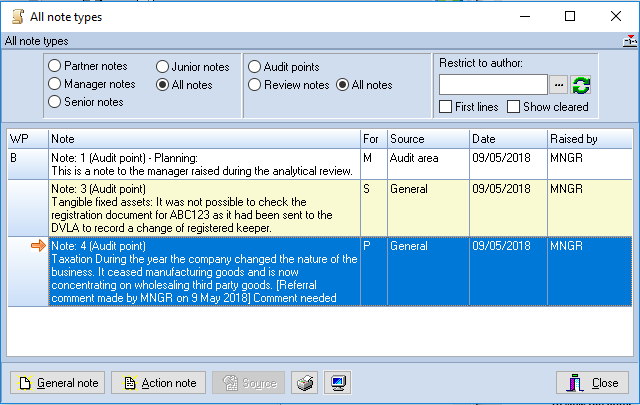
Audit notes window
From this screen you can action notes to clear them, enter a general audit or review note, print and print preview the notes. The window contains a list of the full text of all outstanding audit notes, with columns showing the audit area reference to which the note related, who the note is aimed at, the source of the note (i.e. if it was entered during audit test completion, checklist completion, as an area note or a general note), the date it was raised, and by whom. If a red arrow appears by a note, it indicates that the note has been referred by the original recipient to a different level.
When the list is first displayed it will only contain uncleared audit points aimed at your level of user. You may request the system to show all notes to your level by clicking on the Show cleared checkbox. Cleared notes will be included and shown in grey. To hide the cleared notes, click on the checkbox again to remove the tick.
To view the notes aimed at a different level, or to show notes to all levels, click on the relevant radio button.
You may restrict the notes listed to a specific note type, audit points or review notes, or display all note types. To change the listing, click on the appropriate radio button. This setting, and the level setting, is persistent and will be retained for subsequent accesses.
Entering a general audit point or review note
To enter a general note, click on the [General note] button. The Note for area dialog will appear with an indication that you are entering a general or review note.

You may now enter the note and click on the radio button to indicate the level of the recipient. If the note represents an audit point rather than a review note, you should click on the Audit point radio button. Finally click on [OK] to save the entry. If you decide that you do not wish to record your note, clicking on [Cancel] will abort the process.
Clicking on [Send] will result in an email being composed based on the information displayed, for sending to all staff recorded in the staff file at the level to which the note is addressed. This will be displayed on the screen for you to edit before sending. If you are using Outlook, the Outlook send dialog will be used, if not then the internal email dialog will be used.
On returning to the Audit note window, the system will add your note to the list. All general notes appear at the foot of the list and with no audit area reference.
Note:
While it is possible for a manager, or partner, to raise review notes to a lower member of staff in respect of a section that has already been signed off, once a staff level has signed off the audit on the Completion menu, the system will no longer allow notes to be raised to that level.
To ensure that any review notes raised to a level that has signed off an area have not been missed, the system checks that all notes to lower levels have been signed off when the manager or partner runs the option to sign off the audit.
To clear a note
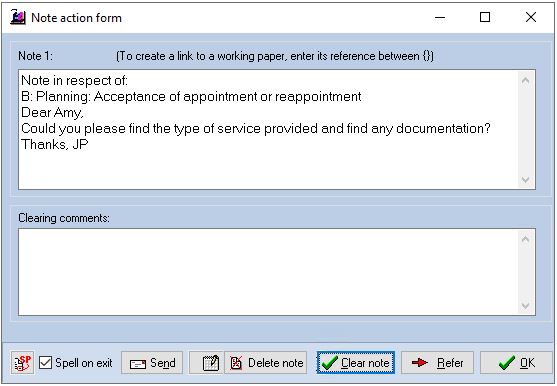
If you have logged in as a senior, manager or partner, you may select an audit note aimed at your level and action it, either by double clicking on the note, or highlighting it and clicking on [Action note]. The Note action form will be displayed.
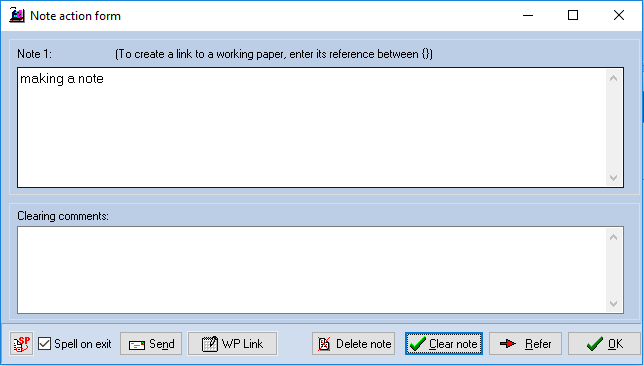
Note action form
You may clear the note by entering a clearing comment and clicking on [Clear note]. If you click on [Clear note] without entering a clearing comment, the system will advise you that a comment is required. To exit from the dialog without taking any action, click on [OK]. If you have logged in with a level lower than that to which the note has been directed, you can view this dialog but the [Clear note] button will be inactivated.
If the note was cleared it will turn grey in the Audit notes window. The next time this window is accessed the note will not be shown as the list only contains uncleared notes when first shown.
If you display the Note action form for a note that has been cleared, an additional button will appear, [Add to comment]. Clicking on this button allows you to add to the clearing comment after the note has been cleared and your comment appears following a line indicating that you added the text. More than one person can add to comments and the system identifies each. If you add to a comment and later return to the note and click on the button the system extracts your comments from the text and offers it for edit. After you have changed it and saved it again it is added back to the comment text. Note that the last person’s comments will always appear at the end of the text even if they had commented earlier. I.e. editing a comment moves it to the end of the text.
When you display the Note action form for a note that has been cleared, the [Clear note] button changes to [Reactivate note]. This allows you to reverse the clearing of the note and puts it back on the notes list. If you click on the [Reactivate note] button the system will first check that you want to do this, and if you click Yes, a reason for reactivating the note needs to be entered.
Review notes
The only exception to the above mode of operation is for review notes. Once a review note has been cleared it will appear in red in the list. This is to indicate that the person the note was aimed at has dealt with it, but the system does not consider the matter complete until the person who raised the note, has confirmed that they are happy with the way the note has been cleared. To do this, select the note for action and two new buttons will be show; [Reinstate note] and [Confirm answer]. If you are happy with the way that the note has been dealt with, select [Confirm answer]. However, if you wish the matters looked at again, click on [Reinstate note] and enter your instructions. If you take the latter course, the note will be reactivated and will need to be cleared again by the recipient. The only restriction on confirming review notes is that you can only confirm notes raised by someone of your level or lower.
Transferring notes to documents
There may be occasions where you wish to repeat the details that have been entered in a note in the planning memo, points forward memo, opinion summary or management schedules. Audit Automation allows you to do this without the need to retype the details using the pop-up menu which appears when you press the right mouse button when pointing to the text of the note in the Note action form dialog. Simply pop up the menu, select the item required and either the internal word processor will be launched, or Word, and the text inserted or appended to the document. The item will be headed with an indication of the source of the text.
Referring notes to others
The system allows you to refer notes to others where this is appropriate. For example, a manager may wish to refer a note up to a partner if the matter requires consideration at that level, or refer it down to the senior if it should be reconsidered or more information is required. A note may also be referred to the same level if you simply wish to add comments to the text of the note but cannot clear it at this time.
To refer a note, click on the [Refer] button in the Note action form dialog and the Comment on note being referred dialog will appear.
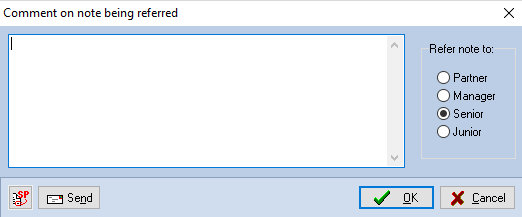
Comment on note being referred dialog
As can be seen, the dialog allows you to indicate the level to which the note should be referred, and allows you to enter a referring comment. This comment is appended to the note itself and therefore leaves the clearing comment free for the final clearing text.
Clicking on [Send] will result in an email being composed based on the information displayed, for sending to all staff recorded in the staff file at the level to which the note is addressed. This will be displayed on the screen for you to edit before sending. If you are using Outlook, the Outlook send dialog will be used, if not then the internal email dialog will be used.
To print and print preview the notes
The Audit notes window contains a [Print] button which will result in a list of notes being printed containing all notes directed at the level currently displayed. The list of notes produced will include both cleared and uncleared notes.
On clicking the [Print] button, the system will display the standard Windows Print dialog to allow you to select a different printer or accept the default shown.
There is also a [Preview] button, the button with a picture of a monitor on it, that displays a preview of the notes in the format they would be printed.
Drill down to source
For notes entered via an audit test or checklist question, you can view the audit programme or checklist from which the note arose by highlighting the note and clicking on the [Source] button. The system will load the programme or checklist and display it in the relevant completion dialog with the source test or question highlighted.
Opinion notes
The system caters for a third note type, opinion notes. Opinion notes will only be visible if the master pack to which the client is attached is set to use opinion notes as opposed to a textual opinion summary. If the option is set, then a third radio button will appear under the Review note radio button on the Notes and Note for area dialogs. These allow you to enter notes regarding problem areas and significant matters that could have a bearing on the opinion reached on the accounts and record the work you have carried out and the conclusion reached.
In all respects the opinion notes work in the same way as audit points and review notes.
Changing the note type
There may be circumstances where you wish to change the nature of an area note. For example, a review note may become an audit point or an opinion note. It is also possible that a note may be wrongly classified when first entered and you simply wish to correct this.
To change a note type, highlight it in the Notes dialog and click on the right mouse button. Select Change note type from the pop-up menu and a dialog will be displayed displaying radio buttons for the available note types. Select the type to be allocated to the note and click on [OK].
Note list restriction
An option is provided in the Notes dialog to allow you to restrict the list of notes to those raised by a specified member of staff. This is useful if you wish to display, say, all the review notes that you have raised and see how they have been cleared, or to see if any are still outstanding. To restrict the list, enter the initials of the author whose notes are to be displayed in the Restrict to author field and then click on the button. The setting will be applied without you clicking on
  if you select any other option that causes the list to be refreshed. You may also select the initials from the list of users by clicking on the button to the right of the edit field. If you do this, you do not need to click on [Refresh] as the list will be refreshed as soon as you select the initials to use.
Removal of review notes
If you need to remove review notes from an audit pack, there is an option on the Utilities menu. A system option is available on the System options tab of the System settings dialog, accessed via File [System options], to allow you to indicate if you wish this facility to be made available.

The facility will be turned off as the default setting. If you turn it on by placing a tick in the checkbox, the option will be available in the following circumstances:
1. The option to force onscreen completion is off.
2. The option is on and the pack has been fully signed off.
3. The user accessing the pack is at manager level or above.
On selecting the option, the system will display the following:
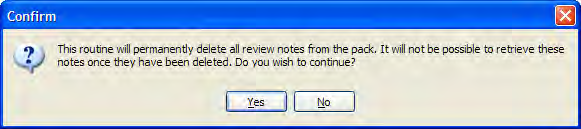
This is to remind you that the action is irreversible, once removed the notes cannot be recovered. If you indicate that you wish to proceed, the system will remove the notes and advise you how many notes were removed. It will also add a record of the action in the audit trail.