Importing data from third party systems

CCH Audit Automation incorporates a user definable mapping and import facility which caters for importing data from any third-party system even if all you can get out of the system is a printed report as a text file
Import mapping files
A mapping file contains a list of codes that exist in the third-party product and the CCH Audit Automation account to which transactions, or balances, in respect of the code should be posted. Each CCH Audit Automation code can be included any number of times and hence you can have multiple accounts from the external program being consolidated into one account within CCH Audit Automation.
An option is present on the Reference menu, called [Mapping files]. When you select this, the following dialog will be displayed.
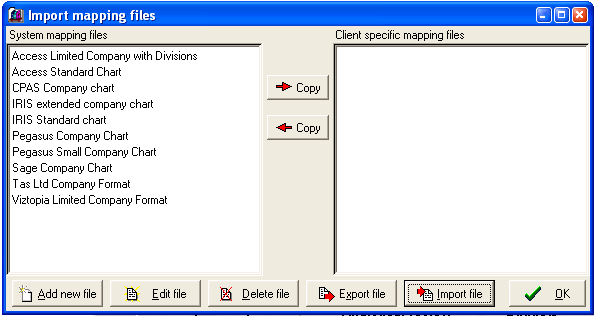
This dialog shows in the left panel, system wide mapping files, i.e. mapping files that will be available no matter which client is loaded, and in the right panel mapping files that have been created, or modified, for the client you are working on. The panels will be populated with any mapping files that have already been created. Note that the system wide files are maintained in the CCH Audit Automation data path. If you are working from the network this will therefore show the mapping files contained in the data path on the network and if you are working locally, those stored on your local hard disk.
Adding a new mapping file
To add a new file, click within either the left or right panels to indicate if you wish to create a system or client specific mapping file, click on [Add new file] and a blank Mapping file definition dialog will be displayed:

Enter the name by which you wish to identify the mapping file and then click in the grid under External code.
Type the first code from the external system and press <Tab> or <Enter> to move to the next column. Enter the Account name, this is optional and is provided purely as a visual guide when editing the file. Finally enter the CCH Audit Automation code to which amounts in respect of the account are to be posted. If you do not know the code, you can use the [Pick] button to select the code from the pick list. If you enter a code that CCH Audit Automation does not recognise, the pick list will be displayed.
After you have entered all the codes, click on [OK] and the file will be saved and the dialog closed.
Importing the third-party chart
If you can export the chart from your third-party system, you can populate the first 2 columns of the mapping file using the [Import chart] button. The import file must be a text file, comma separated and include as the first 2 fields on each line:
Code, Account name, …….
Any fields after this are ignored and it does not matter what they contain.
On selecting the option, the system will display the standard Windows Open dialog. Select the file that contains the chart to be imported and click on [OK]. The first 2 columns will be populated and you can now move down the last column entering the CCH Audit Automation codes. Note that you can use the arrow keys to move up and down the grid as you enter this data.
Printing the import file
You can obtain a hard copy of the file you have created, or edited, by clicking on the [Print] button. The system will ask you to select the printer to which the report is to be sent and will return to the above dialog after the report has been produced.
Editing an existing mapping file
To load an existing file for editing, you may either double click on the name of the file, or click on it once and then select [Edit file]. The system will load the file and display it in the Mapping file definition dialog and you may edit any of the information displayed apart from the name of the file.
When you have finished making your changes, click on [OK] to save them and close the dialog. Alternatively, you can discard any changes made by clicking on [Cancel].
Deleting a mapping file
If you wish to remove a mapping file, select the file with the mouse and click on [Delete file]. The system will ask you to confirm that you wish to remove the file before carrying out your instruction. Deletion is permanent and once deleted a file cannot be recovered.
Copy a mapping file to or from a client
To copy a mapping file to a client, select the file to be copied from the System mapping files list and click on [Copy]. The system will ask you to enter the name that you wish to use to identify the mapping file in the client’s data, with the following dialog:
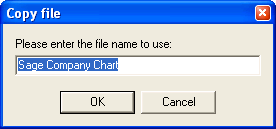
It will offer the name by which it is known in the source list and you may accept this or change it to use a name meaningful in the context that it will be used. Enter the name and click on [OK]. Providing a mapping file with the same name does not exist in the client specific list, it will be copied to the client’s data. You are now free to edit this mapping file to customise it for the client. Note that to have the import routine use the customised version, you will need to copy the import definition to the client’s data and change the definition to use the client version of the mapping file, as described on the following pages.
To copy a mapping file from the client’s data to the system list, select the file to be copied from the Client specific mapping files list and click on [Copy]. The system will follow the same procedure as set out above and providing a mapping file with the same name does not exist in the system list, it will be copied. You are now free to edit this mapping file as required.
Exporting a mapping file
There may be occasions when you wish to transfer a mapping file from one client to another, from one computer to another, or from your network data path to your local machine. You can use the export and import options to carry out this transfer.
Open a client from which you wish to export the file, or one on the data path from which you wish to export a system file. Select Reference [Mapping files] and highlight the name of the file to be exported by clicking on it with the mouse. Select [Export file] and the Windows Save as dialog will be displayed. Select the destination folder, enter a name for the file and click on [OK]. The file will be saved with an extension of “PMF” being a CCH Mapping File. You may now import this file to another client, or to the system list on another database.
Importing a mapping file
Open the client to which you wish to import the file, or one on the data path to which you wish to import a system file. Select Reference [Mapping files]. Click in either of the mapping lists to indicate whether you wish to import to the system or client area and click on [Import file]. The Windows Open dialog will be displayed. Select the source folder and the file to be imported and click on [OK]. The system will ask you to enter the name that you wish to use to identify the mapping file, with the following dialog:

It will offer the name by which it was known before it was exported and you may accept this or change it to use a name meaningful in the context that it will be used. Enter the name and click on [OK]. Providing a mapping file with the same name does not exist in the destination list, it will be imported.
Import definition files
The import definition files provide the means by which you can define the format of the file that you are going to import from a third-party system. You can have any number of definitions and these can be system wide or specific definitions that have been customised for a client. The system allows you to create rules for importing from the following file types:
• Comma separated (CSV) – a text file where each line represents a record and the fields of the record are separated by commas.
• Line feed separated – a text file where each field of a record is on consecutive lines and there are a fixed number of lines to each record.
• Fixed position format – a text file where the data stored is in a fixed position on each line. This is the type of report that will be created from a print dump to file or exporting to a text file.
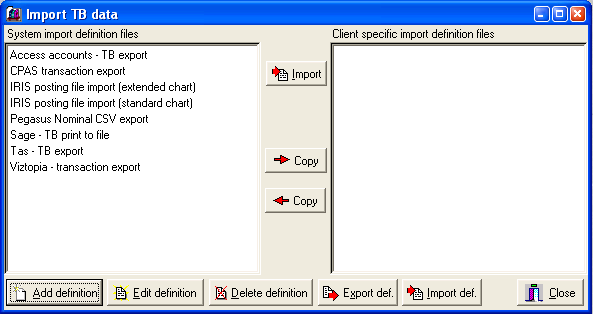
The option on the Data entry menu, called [Import TB from other systems] will open the definition files dialog. This dialog is used in much the same way as the Import mapping files dialog described above, providing options to add, edit, delete and copy definition files, however, it contains an additional option to carry out the import of data.
When you select this, the following dialog will be displayed.
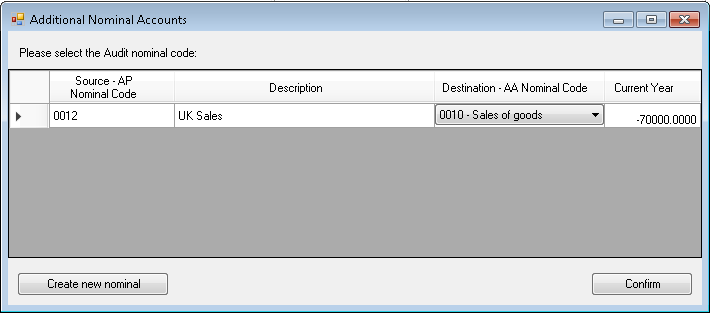
It is also possible to update the trial balance in CCH Audit Automation from CCH Accounts Production without the need to export and import the data using a csv file. An option on the data entry drop down called Update TB from CCH Accounts Production.
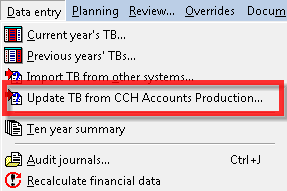
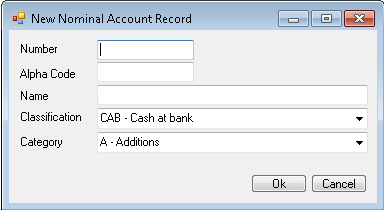
This option is for use where the nominal codes in CCH Accounts production and CCH Audit Automation match. If any new nominal codes have been added in accounts production the user will be promoted to provide the mapping in audit or create the new code. This can be done as part of the update procedure.
Adding a new definition file
To add a new file, click within either the left or right panels to indicate if you wish to create a system or client specific definition file, click on [Add definition] and a blank Trial balance import definition dialog will be displayed:

It is useful to have a sample file displayed while you are defining the structure, and you can do this by first exporting a file in the format that you will use when transferring data and then entering the path and name of the file in the File to import field, or selecting it using the [Browse] button. To see the file, click on [View file]. If you wish to scroll vertically through the file, click on [Show memo scroll bar] and a vertical scroll bar will appear.
Enter a name to identify the file and then proceed to complete the dialog as follows:
Mapping file
Enter here the name of the mapping file that contains the codes relevant to the external product. You may either type the name, or use the browse button at the end of the field to select a file from a list. Click on the button and the following dialog will appear:
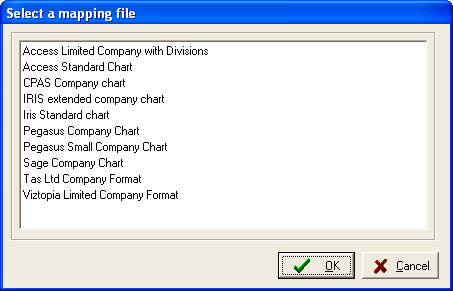
Select the file to be used and click on [OK]. Note that if you are defining a system definition file, only the list of system definitions will be available to you. If you are defining a client specific file, a checkbox will appear at the bottom of the dialog called Client specific mapping files. Ticking this dialog will display the list of mapping files that have been stored for the client and you may select a file from this list. This is the only way to switch to a client specific mapping file, you cannot do it by simply typing the name in the edit box.
Format
Select the format of the file by clicking the appropriate radio button. The Delimiter defaults to a comma “,” but it can be changed to any character, e.g. ';'. To indicate that the file to be imported uses the Tab character as a delimiter, enter a “T” in the definition field.
Report header to be skipped
If the file to be imported contains a number of lines that form a header to the report and do not represent data to be imported, tick this checkbox and enter the number of lines in the next field. If the file to be imported contains page breaks, the number of lines specified will be skipped after each page break is encountered.
Lines to ignore
Enter the number of lines to be ignored at the top of each page of the report. This field is only used if the previous field is ticked.
Excluded code list
If you are importing from a print to file report, there will sometimes be lines that contain information other than data to be imported. This can also happen in other types of file where the export includes other data, such as totals. The system will ignore any line where the code is blank, see the exception to this referred to below when a narrative is included, and this option allows you to define a list of text that, if found in the code field should result in the record being ignored.
Click on the [Excluded code list] button and the following dialog will appear:
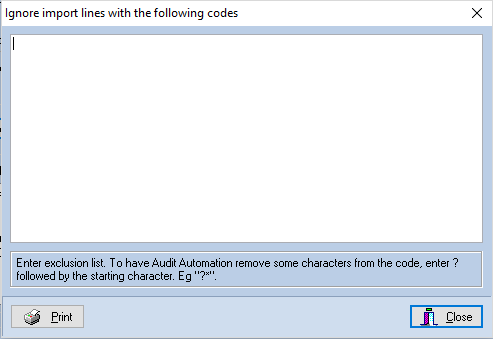
Enter the list of text items to be ignored, one item per line. Up to 20 items can be defined.
The list provides a further facility. Codes exported from other systems can sometimes contain more data that you require for import. For example, you may wish to ignore sub codes following a ‘/’ and just import data based on main codes. Another instance would be where memorandum data is included in a code following a specified character, such as an ‘*’.
You can tell CCH Audit Automation to ignore everything that appears after specified characters by including a line starting with a “?” and followed by the character, or characters, that identify the start of the string to be ignored. In the cases specified above, you would include the following 2 lines:
?/
?*
You can have any number of these lines defined within the overall limit of the 20 items referred to above.
Content
You now need to tell the system the fields that you wish to import from the file. Do this by double clicking on the relevant items in the Fields available list. As you double click on each item, it will be moved to the Fields selected list.
The order that the items appear in the list is important for a CSV or a line separated file, as they must match the order in which they appear in the file. For a CSV file, it does not matter if there are more fields in the file than defined as the extra fields will be ignored, however, for a line separated file, you must define the exact number of lines that make up each record for the system to know where each record starts. If there are fields that you wish to skip, you can insert one of the 9 dummy field items to tell the system to skip it.
For a fixed position format file, you need to create the list of selected fields to import and then indicate to the system the position of each field on the line. First create the Fields selected list, order does not matter in this case and you do not have to worry about dummy fields as any area not selected will be ignored. Next, you need to tell the system where each field is positioned on the page. To do this, make sure that the area that contains the data is visible in the file preview area, using the horizontal scroll bar, select the field in the Fields selected list and then move the mouse to the bar above the file preview. Point in the bar above the start of the field, hold down the left mouse button and drag it to above the end of the field. A coloured bar will appear indicating the area that you have selected and a number will be shown indicating the position in the list of the field that it represents. If you make an error in selecting the position and width, just repeat the process. Repeat this for each of the fields in the list.
The following fields are available to import data to:
• External system's code
• Narrative
• Value debit column or combined debit and credit column (unsigned = debit, negative = credit)
o Current year Dr (or Dr/-Cr)
o 1 year ago Dr (or Dr/-Cr)
o 2 years ago Dr (or Dr/-Cr)
o 3 years ago Dr (or Dr/-Cr)
o 4 years ago Dr (or Dr/-Cr)
o 5 years ago Dr (or Dr/-Cr)
o 6 years ago Dr (or Dr/-Cr)
o 7 years ago Dr (or Dr/-Cr)
o 8 years ago Dr (or Dr/-Cr)
o 9 years ago Dr (or Dr/-Cr)
• Value credit column (unsigned = credit, negative = debit)
o Current year Cr
o 1 year ago Cr
o 2 years ago Cr
o 3 years ago Cr
o 4 years ago Cr
o 5 years ago Cr
o 6 years ago Cr
o 7 years ago Cr
o 8 years ago Cr
o 9 years ago Cr
• Dummy items, data will just be skipped
o Account name
o Dummy field 1
o Dummy field 2
o Dummy field 3
o Dummy field 4
o Dummy field 5
o Dummy field 6
o Dummy field 7
o Dummy field 8
o Dummy field 9
Where a narrative has been included in the import, the system can associate two lines of narrative with the same item. If it encounters a line where the code field is blank but there is data present in the narrative field, it will prefix the text found to the narrative of the data on the following line.
Previewing
To see if you have entered the correct definition, enter, or select, a file to import, and click on the data [Preview import]. The system will carry out a dummy import of the first 20 records and display the result in the preview area.
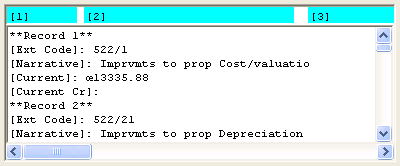
Don’t worry about extra characters, such as the odd looking character in front of the value. In this case it was an exported currency symbol and will be removed by CCH Audit Automation prior to posting the data.
When you are happy with the definition, click on [Save] to save the file and return to the Import TB data dialog.
Editing an existing definition file
To load an existing file for editing, click on it and then select [Edit definition]. The system will load the file and display it in the Trial balance import definition dialog and you may edit any of the information displayed apart from the name of the file.
When you have finished making your changes, click on [Save] to save them and close the dialog. Alternatively, you can discard any changes made by clicking on [Cancel].
Deleting a definition file
If you wish to remove a definition file, select the file and click on [Delete definition]. The system will ask you to confirm that you wish to remove the file before carrying out your instruction. Deletion is permanent and once deleted a file cannot be recovered.
Copy a definition file to or from a client
To copy a definition file to a client, select the file to be copied from the System import definition files list and click on [Copy]. The system will ask you to enter the name that you wish to use to identify the definition file in the client’s data, with the following dialog:

It will offer the name by which it is known in the source list and you may accept this or change it to use a name meaningful in the context that it will be used. Enter the name and click on [OK]. Providing a definition file with the same name does not exist in the client specific list, it will be copied to the client’s data. You are now free to edit this definition to customise it for the client. Note that the mapping file used will still be the system mapping file in the original definition. If you wish to switch to use a customised mapping file within the client data, you will need to edit the definition and change the mapping file used, as described above.
To copy a definition file from the client’s data to the system list, select the file to be copied from the Client specific import definition files list and click on [Copy]. The system will follow the same procedure as set out above and providing a definition file with the same name does not exist in the system list, it will be copied. You are now free to edit this mapping file as required. The same comments relating to the mapping file in use apply, so you may wish to check that the definition is using a system mapping file, and change it if it is not.
Exporting a definition file
There may be occasions when you wish to transfer a definition file from one client to another, from one computer to another, or from your network data path to your local machine. You can use the export and import options to carry out this transfer.
Open a client from which you wish to export the file, or one on the data path from which you wish to export a system file. Select Data entry [Import TB from other systems] and highlight the name of the file to be exported by clicking on it with the mouse. Select [Export def.] and the Windows Save as dialog will be displayed. Select the destination folder, enter a name for the file and click on [OK]. The file will be saved with an extension of “PID” being a CCH Import Definition file. You may now import this file to another client or to the system list on another database.
Importing a mapping file
Open the client to which you wish to import the file, or one on the data path to which you wish to import a system file. Select Data entry [Import TB from other systems]. Click in either of the definition lists to indicate whether you wish to import to the system or client area and click on [Import def.]. The Windows Open dialog will be displayed. Select the source folder and the file to be imported and click on [OK]. The system will ask you to enter the name that wish to use to identify the mapping file in the client’s data, with the following dialog:

It will offer the name by which it was known before it was exported and you may accept this, or change it to use a name meaningful in the context that it will be used. Enter the name and click on [OK]. Providing a definition file with the same name does not exist in the destination list, it will be imported.
Importing financial data
To carry out an import, select Data entry [Import TB from other systems] and the Import TB data dialog will be displayed. Either double click on the name of the definition to be used, either from the system or the client list, or select it by clicking on it with the mouse and then click on [Import]. The Windows Open dialog will be displayed from which you may select the folder and file containing the data that has been exported from the third-party system. Click on [Open] and the system will scan the file for errors and display the results in the TB import verification report dialog.
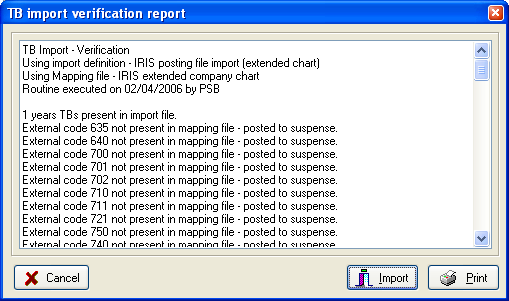
This will show the details of the definition selected, the number of years data found to import and a list of any problems found. Problems will be such matters as a code not being found in the mapping file, a code not being present in the client’s chart of accounts, or the data imported not forming a balanced TB.
You now have one of 2 options, you can either cancel the import by clicking on [Cancel] or proceed with the import by clicking on [Import]. If you cancel, you can then correct the mapping file to add any codes not found, or export the data again if, say, the wrong file format was used, and try the import again.
Note that you can run the import any number of times, as each import clears the data currently held, for the number of years being imported, before proceeding. Note, however, that prior years not included in the import will not be affected by the process.
Viewing imported data
The Trial balance dialog allows you to view and print the details of the entries that were imported to each account. If you imported transactions, rather than TB totals, this will equate to a detailed nominal ledger.
To view the details, display the trial balance by selecting Data entry [Current TB], highlight the account in which you are interested by clicking in the Debit or Credit column on the account line, press the right mouse button and a pop-up menu will appear. The first item on this menu allows you to display the items that were imported to the selected account. Select this and the Imported data dialog will appear.
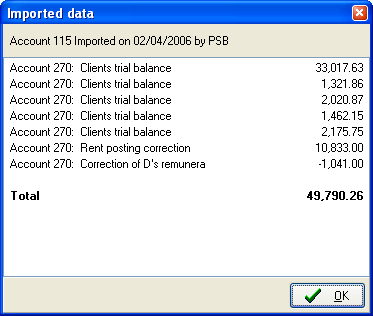
When you have reviewed the information, close the dialog by clicking on [OK].
Prior years
Each time you carry out an import, the system clears the trial balances for the years for which data is present in the import file, deletes the details of the items imported and then proceeds to carry out the import. Hence, the details of the items that make up the balances held in each of the years imported is available to view when the relevant TB is displayed. However, the details of the make up of earlier years will not be available to view if they were not included in the latest import.
Print import report
You may, at any time, produce a report showing the imported data making up each nominal account. To do this, display the Trial balance dialog, press the right mouse button while pointing to the TB area and select Print import report from the pop-up menu. The system will display the Windows Print dialog to allow you to select the destination of the report. Select the printer and click on [OK] and the report will be produced.