Data Entry

The Data entry menu enables you to perform the following:
• Enter and print the current year’s trial balance
• Enter and print a previous year’s trial balance
• Import data from Accounts Production
• Import data from other systems
• Print 10 year summary
• Enter and print audit journals
The system stores the trial balance for the current year and up to 9 past years. It is not necessary to have all 9 years entered, however if you wish to use the trend analysis capabilities of the system, you must have at least 3 past years stored. The analytical review schedule shows key ratios for both the current and the previous year, so for this to be meaningful last year’s figures must be entered.
Data can be entered from the keyboard by selecting the [Current TB] and the [Prior TB] buttons from the Data entry menu, or it can be imported from Accounts Production or other accounting systems. If you select the option to edit the current year’s TB, and audit journals have been entered, the system will advise you of this and ask for confirmation that you wish to continue.
Input current year's trial balance
To enter current years data from the keyboard, select [Current TB] from the Data entry menu. The system will prepare the data and present the Trial Balance on the screen for edit.

Trial balance entry window
When this routine is first accessed, the entry field will be positioned over the debit column of the first account displayed. You may proceed as follows:
| <Down arrow> | Move down to the next account |
| <Up arrow> | Move up to the previous account |
| <Right arrow> | Move to the credit column |
| <Left arrow> | Move to the debit column |
| <Page Down> | Scroll down a screen of codes at a time |
| <Page Up> | Scroll up a screen of codes at a time |
| <Enter> | Move to the next field, which will be the credit column if you are currently in the debit column of an account or the debit column of the next account in the list if you are currently in the credit column |
You may also move through the list using the scroll bar, and click on a figure to select it.
When the account to be changed is highlighted, you may enter the amount of the debit on the account, or press <Enter> to move to the credit column and enter the credit amount. If the field to be entered already has a figure in it, press <F2> to edit the contents, otherwise simply type in the data. After the credit amount has been edited, the system will move to the debit of the next account. As the highlight moves down the Trial Balance each time you complete the entry of an account, it is very easy and quick to enter a full Trial Balance into the system.
You may also jump to a specified code in the trial balance by selecting the Go to edit box and typing the code to which an entry is to be made. As you type the system will redisplay the trial balance selecting the code that is the nearest match to that which you have entered. Press <Tab> and the entry field will move to the debit column of your selected code and you are free to enter data as described above.
If your entries do not balance, the difference is shown and you will not be allowed out of the routine. Once the figures balance, click on [OK] and the system will analyse the TB and calculate the system variables before returning to the Pack window.
If you are entering a draft or estimated TB for the purpose of planning, you should tick the Draft TB checkbox. Once you have replaced the draft TB with the actual figures then clear this box. While this box is ticked the system will not allow you to enter adjusting or reclassification journals, all you will be able to do is enter journals as potential errors. Once the box is cleared you will be able to recall the journals and change their type to adjusting or reclassification, and flag them as agreed with the client where appropriate.
You may move up and down the chart of accounts entering and editing the figures as you proceed until the whole of the trial balance has been entered.
When a TB is first displayed, it is presented in account number order. If you would prefer it to be presented in alpha code order, click on the [Code order] button. You may now enter the TB in the same way as described above, or switch back to numeric order by clicking on the [Number order] button that will now be showing. The system remembers the last mode of display and will always present the TB to you in that mode the next time that you access it.
To the left of the current year’s TB, the system displays the previous year’s, or period’s, figures. This is purely for information and to assist you in identifying the accounts into which the data was entered in the previous period.
You may select the [Suppress zero balances] option to only show the nominal codes that have been posted to.
Include journals
When the TB is first displayed, it will always represent the original client’s TB before audit journals. If you wish to display the TB after audit Journals, click on the [Include journals] button and the TB will be updated to include agreed journals. Any accounts that have changed as a result of such journals will be displayed in red and the button will change to read [Exclude journals]. To redisplay the original TB, click on this button.
Entering previous year's trial balance
To enter or edit a previous year’s trial balance, select [Prior TB] from the Data entry menu.
On selecting this option you will be invited to select the year to edit with the following dialog:

Trial balance year dialog
Select the year to edit, either by double clicking on the year in the list box, or clicking on it once and then on [OK], and the system will prepare the data for edit and display the Trial balance entry window showing the data for the year selected. You may then proceed to edit the trial balance, as described above for entering current year’s data.
Import data from other systems
CCH Audit Automation contains a user definable mapping and import facility to allow you to import data from any system that can export the data in a readable format. This is fully covered in the next section.
Print current year's TB
The trial balance for the current year can be printed by clicking on the printer icon button displayed on the Trial balance entry window, when the current year is loaded for editing. On selecting this button, the system will display the standard Windows Print dialog to allow you to change the printer if you wish before commencing printing.
Print previous year's trial balance
The trial balance for a previous year can be printed by clicking on the printer icon button displayed on the Trial balance entry window, when the year’s TB is loaded for edit. On selecting this button, the system will display the standard Windows Print dialog to allow you to change the printer if you wish before commencing printing.
Print 10 year summary
It is possible to produce a report listing the 10 years data stored in columnar form, by selecting [Ten year summary] from the Data entry menu. On selecting this button, the system will compile the report and display it in the View report dialog. See page 56 for details of how to use this dialog.
Audit journals
CCH Audit Automation provides the facility for you to enter audit journals as you discover amendments which need to be made, and potential errors, during the course of your audit. Audit journals are classified into three types:
Adjusting Entries which are expected to affect profit or adjust for errors in the books.
Reclassification Intended for use for changes in presentation etc.
Projected misstatement Estimates of the potential possible misstatements which might exist, projected from actual errors found during testing.
Including projected misstatements allows the system to summarise in one place all unadjusted misstatements, actual and potential.
When a journal is first entered, the system assumes that you are recording the journal for discussion with the client, and that it has not yet been agreed that the journal will be reflected in the accounts. This is reflected by the Journal entry agreed with client check box remaining unchecked, and No appearing in the Adjust column of the journal list. All such journals will appear on the Potential audit journals not reflected in financial statements schedule.
Providing the entry is not a projected error, the check box may be checked at any time to indicate that the journal has been agreed with the client and this will move the entry to one of the audit journal schedules. This mode may be changed at any time prior to the journal being committed to a journal posting file. Once the entries have been transferred to Accounts Production, or another accounts package, the mode is fixed and cannot be changed back to “not agreed”. In addition, other details relating to the journal, such as amount and nominal codes will also become fixed, however, you are still able to change the type of the journal after it has been transferred.
Note: If the trial balance is flagged as draft, you can only enter projected errors and cannot mark them as agreed with the client. As soon as you indicate that the TB is finalised, by removing the tick from the Draft checkbox, you will be able to change the classification of the journals to one of the other types and mark them as agreed.
There may be occasions when a potential journal has been entered but it is agreed that the effect is too small to warrant adjusting the accounts. Once a journal is marked as trifling, it is no longer recorded as either an adjusting or reclassification journal and it will appear on a separate schedule called “Trifling Journals Not Reflected in Accounts”. To record a journal as trifling, open the Journal entry form and tick the checkbox Trifling not adj. The system will append appropriate wording to the narrative of the journal. You can reverse this decision at any time by removing the tick from the checkbox.
To enter a journal, select the [Journals] button from the Data entry menu, and the Audit journals window will be displayed. This lists all existing journals. From this list, click on [Add] to add a new journal, [Edit] to edit an existing journal and [Delete] to delete a journal. Only entries that have not been agreed with the client can be deleted. In addition, certain editing restrictions apply where journals have been agreed and/or posted to your accounting programme.
Audit journals window
To add a journal
Click on [Add] from the Audit journals window and the Journal entry form will be displayed.

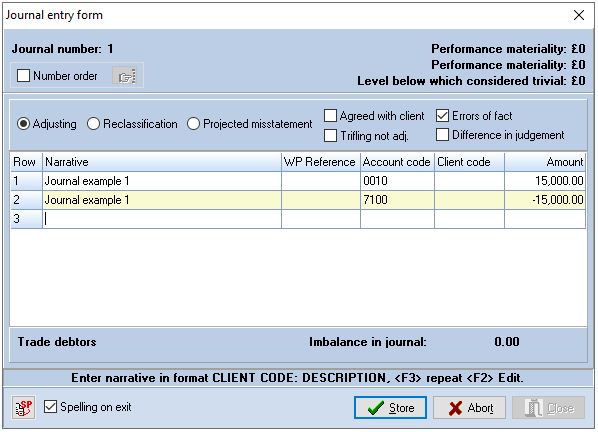
Journal entry form
The following is a description of the purpose of each field in the form:
| Journal number | Sequential number allocated by the system. |
| Journal agreed with client | Confirmation of the status of the journal, i.e. has correction of the financial statements been agreed with the client. If this box is checked this informs the system that the journal has been agreed. |
| Errors of fact / Difference in judgement |
You can select when working with audit journals to allow you to indicate if the journal is an error of fact or a difference in judgment. You may tick either of these checkboxes or they can both remain blank. Error of Fact is the default setting. |
| Journal type | See above for an explanation of the three types. Click on the radio button representing the type of journal entry. If you select Projected misstatement the system will inactivate the Agreed check box as it would not be appropriate to reflect the journal in the financial statements. |
| Narrative | A 200 character narrative describing the nature of the entry. A narrative should be provided on all lines. |
| WP Reference (Working paper reference) |
A 20 digit reference to show the source or working paper from which the journal arises. The reference is shown on the journal listing and may be left blank. |
| Account code | The code of the account to be debited or credited. Note that this is the code of the account and not the CCH Audit Automation account number. A [Pick list] button is available for code lookup. |
| Client Code | A 20 digit associated nominal ledger account in the client’s accounting system, or your third party accounts production system. This column is only shown if the Client code on journal entry is checked under system options. |
| Amount | Amount of the journal - which should be entered unsigned if it is to be debited to the account and as a negative amount if the account is to be credited. |
Where appropriate, when you are entering a second or subsequent line, you can press <F3> to repeat the field from the previous line.
Enter the details of the journal, checking the Journal agreed with client check box if it has been agreed that the adjustment will be made, and then click on [Store]. The journal will be stored and the form cleared to allow you to make further entries. Once all entries have been made, click on [Close] and the form will disappear and the new journals you have added will be included in the list displayed.
When you tick the checkbox to indicate that journals have been agreed with the client, the system records details of the date and who ticked the box at the end of the narrative to the journal. If you subsequently remove the tick the information is also removed.
The system will not allow you to store a journal until you have balanced the debit and credit entries.
If you start to make a journal entry, and decide that you do not wish to continue, click on [Abort] and the form will clear without the entry being stored.
Editing a journal
To edit a journal, either double click on any line of the entry in the Audit Journal window, or highlight it and click on [Edit]. The Journal entry form will be displayed showing details of the journal selected. The fields which are available for edit will depend on the type of entry, whether or not the entry has been agreed with the client or posted to your accounts system.
You may only edit existing lines, you cannot add lines to an existing journal.
Edit any details which require changing and click on [Store] to save your changes and return to the Audit Journal window.
Deleting a journal
A journal may be deleted at any time up to the point that it is committed to a posting file. To delete an entry, highlight a line relating to the journal in the Audit Journal window and click [Delete]. You will be asked to confirm that you wish to delete the journal, and if you do this the journal will be removed.
Print and display journals
It is possible to print, or view, the journal schedules by clicking on the printer or display icon buttons in the Audit journal window. Journals are analysed and printed as follows:
- Audit adjusting journals: showing the entries which have been made to both the profit and loss account and balance sheet, together with a fifth column showing a profit reconciliation between the draft and final accounts. All other fields entered with the journal are also shown.
- Schedule of Unadjusted Errors: report that shows unadjusted errors analysed by classification.
- Audit reclassification journals: the same layout as for adjusting journals but excluding the profit reconciliation column. If any journal appearing on this schedule affects profit, a warning is printed and the overall affect on profit is shown at the foot of the report.
- Potential audit journals not reflected in the financial statement: a list of any journals entered, all three types, which have not been flagged as agreed with the client. A profit reconciliation is shown to indicate how the journals would affect profit, if made. The total effect on profit, both in monetary and percentage terms, is also shown. This schedule therefore forms the Summary of uncorrected errors.
- Trifling Journals Not Reflected in Accounts: on which are listed any journals marked as trifling and hence to be ignored.
On selecting the print icon button, the system will calculate the profit figure and display the standard Windows Print dialog giving you the option to change the printer before commencing printing.
On selecting the display icon button, the system will calculate the profit figure, compile the report and display it in View mode.
Closing the audit journal window
To close the Audit journal window, click on [Close]. The system will analyse the journals and update the nominal and classification balances before returning to the Pack window.
If journals are present for a client, the system will warn you that journals exist if you try and do anything which affects the original TB, e.g. edit the current years TB, import a new TB, clear or recalculate the TB.
In certain circumstances, the system cannot complete the summary of journals and analysis of the trial balance. This happens if the user has other dialogs open that prevent writing to the file that records the journal details, or if the file is open on another terminal. An internal flag is maintained to capture when this has happened and the following warnings appear if the contents of these files are possibly out of date:
- When a client is loaded, the system checks the flag and if the last update failed, advises the user and asks them if they would like to run the routine to recalculate the figures. If the user accepts, the recalculation is carried out.
- When the Audit documentation completion dialog is displayed, the system checks the flag and displays a red warning message at the foot of the dialog advising that the problem occurred and how to rectify it.
An option exists on the Data entry menu to allow the user to run the routine to recalculate the figures at any time, called [Recalculate].
Export of journals (CSV format)
A facility is provided to export journals in CSV format, allowing users to open the file in Excel and edit journal details before passing the details to the client. Select [Export Journals] from the Audit journals window. On selecting this the system will present the standard Windows File save dialog to allow you to select the location and provide a name for the file to be created. This facility creates a file in CSV format containing all journals that have been marked as agreed with the client.