Editing Tailoring Questions

CCH Audit Automation can store up to 9801 questions relating to the books, records or any other information specific to the client being processed. The questions are grouped into 99 areas of 99 questions and each area is given a name to identify it. The questions can be answered Yes or No and sections of the audit pack, audit tests and checklist questions, can be included or excluded on the basis of the answer.
To edit the tailoring questions, load the pack for editing and click on the Tailoring questions option in the Master options list. The system will display the Tailoring Questions dialog containing two grids, the top grid contains a list of the record areas and the bottom grid the questions in respect of the area selected.
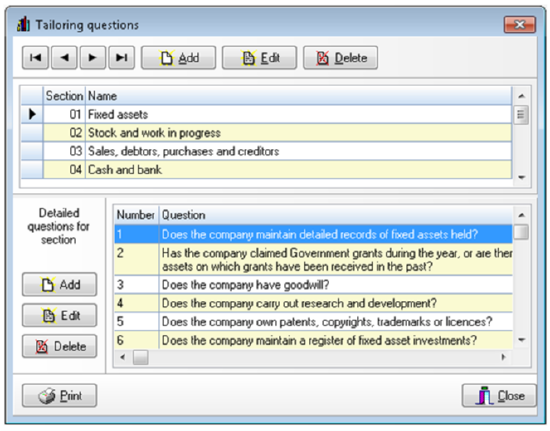
Tailoring questions dialog
As you scroll through the record areas in the top grid, either using the scroll bar or the navigation buttons, the selector marker will move from area to area. As it moves the list of questions in the lower grid will change to list those relating to the area selected. You may also select an area by clicking on it with the left mouse button.
Adding a record area
To add a record area, click on the [Add] button in the group of buttons above the top grid. The Tailoring questions section form will be displayed.
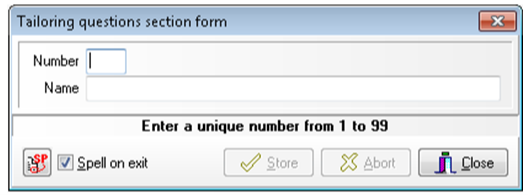
Tailoring questions section form
Enter the number for the new record area, from 1 to 99, and the name to identify it, which may be up to 50 characters. Click on [Store] to save the area and clear the contents of the dialog to allow you to enter another new area. When you have finished adding entries, click on [Close]. The [Abort] button is provided to allow you to clear the contents of the dialog if you have started to make an entry but decide that you do not wish to proceed with it.
Each record area is identified by a number from 1 to 99 and two areas may not have the same number. When you close the dialog the system will return to the Tailoring questions dialog and the new entries will be included in the list of areas.
Editing the name of a record area
To edit the name of a record area, either double click on the name of the area in the top grid, or select it and click on [Edit] in the top group of buttons. The Tailoring questions section form will be displayed presenting the name for edit. Edit the information and click on [Store] to save your changes, clicking on [Abort] will clear the form without recording any changes that you may have made.
It is only possible to edit the name of a record area, once a number has been allocated this cannot be changed.
Deleting a record area
To delete a record area, select the area in the top grid and click on [Delete] in the top group of buttons. The system will request that you confirm your actions before deleting the entry.
Please note: that deleting an area does not delete the questions that appeared within the area.
If you delete an area that contained questions and later reuse the number of the record area the original questions will reappear.
If you wish to remove both the questions and the area you must therefore first delete the questions then the area itself.
Adding questions
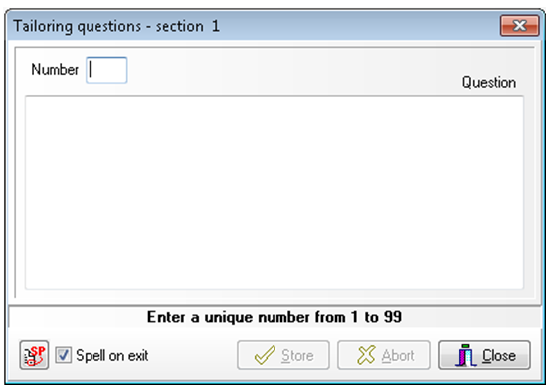
To add a question, select the record area to which the questions relates so that the existing questions for the area are listed in the lower grid, then click on the [Add] button in the group of buttons to the left of the questions. The Tailoring questions dialog will be displayed.
Tailoring questions dialog
The fields in this dialog are as follows:
- Number: The number of the question from 1 to 99. Each question must have a different number, but the questions do not have to have consecutive numbers.
- Question: The text of the question. There is no practical limit to the size of the question and it may be split over a number of paragraphs if that is appropriate.
Enter the number and text for the new question. Click on [Store] to save the question and clear the contents of the dialog to allow you to enter another question. When you have finished adding entries, click on [Close]. The [Abort] button is provided to allow you to clear the contents of the dialog if you have started to make an entry but decide that you do not wish to proceed with it.
When you close the dialog, the system will return to the Tailoring questions dialog and the new entries will be included in the list of questions.
Editing a question
To edit a question, select the record area in the top grid so that the list of questions is displayed in the lower grid. Scroll the list, if required, so that the first line of the question is visible and either double click on the first line in the lower grid, or select it and click on [Edit] in the left group of buttons. The Tailoring questions dialog will be displayed presenting the current data for edit. Edit the information and click on [Store] to save your changes, clicking on [Abort] will clear the form without recording any changes that you may have made.
It is not possible to edit the number associated with a question, once a number has been allocated this cannot be changed.
Deleting a question
To delete a question, select the risk area in the top grid so that the list of questions is displayed in the lower grid. Scroll the list, if required, so that the first line of the question is visible, select it and click on [Delete] in the left group of buttons. The system will request that you confirm your actions before deleting the entry.