Format Designer

Working with Styles
Each cell in a format has a style attached to it to specify the font settings which will be used on the resulting report. Each style has a name to identify it and when you select a call the style name and the formatting settings it contains are displayed in the toolbar.
Change a style used for a cell
- Select the cell.
- Hover over the Styles tab on the right hand side of the spreadsheet and choose a new style from the list of styles that appears.
Themes
The formatting settings for the style are defined in the Theme that is applied to the client. The Theme applied to the client can be changed via the Maintenance > Accounts > Job Themes menu option.
Adding a Format
You can add a format to a collection so that it can be included in the report.
File > Maintenance > Accounts > Format Designer
In this screen you have the option to add a page/note from another Collection or edit an existing page/note. The addition/change will be refelected for all clients using the master pack in use when the addition/change for the entity was made.
Example: to bring in the Exception Report from the Management Collection to the top of the Full Collection within the Limited (FRS102 entity).
- Select the Entity: e.g. Limited (FRS102)
- Select the unpublished Master Pack: e.g. 41.01
- Ensure the Collection Name is Full Accounts
- Size: Default
- The page/note to be added will appear above the one selected, below this will be above the Front Cover
- On the Ribbon Bar select Add Format (if this is greyed out, you are not using a draft master pack - if required To create a draft master pack go to Master Packs - creating a new master pack)
- When you select Add Format, a pop-up display the nmessage a "Add format from a client", choose No

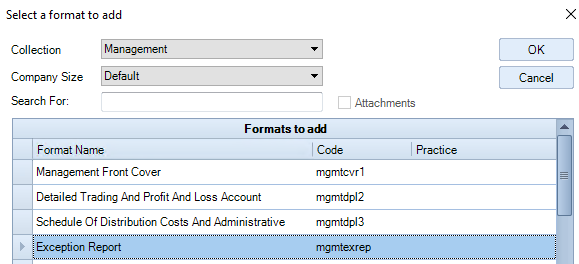
- From the Select format to add dialogue box choose:
- Collection: Management
- Company Size: Default
- Select the page you wish to Add, in our example this is the Exception Report
- Then Click OK
- Now this page will appear at the top of the Full Collection.
Note: If you have brought in a page in and need to move it down (or up) click on Change sequence on the ribbon and drag and drop into position.
You can edit a format to customise it for the client.
Edit a Format
- In Financial statements double click the format you wish to edit.
- With the new tab displaying the format, in the Task Bar under Tasks, select Draft mode.
This displays all possible rows that could output. - Edit the format. The format toolbar provides cut, copy, paste, undo and redo options.
- To save your changes, select Save from the Task Bar.
If you have not saved your changes you will be prompted to do so when you close the format.
If a format is selected by it but you do not want to include it in the financial report, you can exclude it by clearing the check box.
Excluding and Including a Format
To exclude or include a format within a Collection in the Format Designer window
- Choose the Entity, draft Master Pack and Collection Name
- Within the Collection, highlight the page you wish to exclude
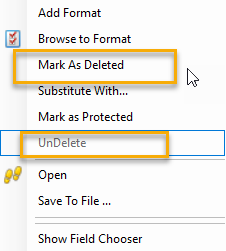
- Right click and choose Mark as Deleted from the list, this will exclude the page /note from the Collection and send it to the top of the list
- If you wish to include at a later date, right click and UnDelete, this will include the page /note within the Collecton and send it to the bottom of the list.
- Click on Change sequence on the ribbon and drag drop to the required position in the Collection.
When toggled on a ruler shows at the top of a format.
The Ruler
When editing a format there is a ribbon option Show Ruler. Click on this to toggle on and off the display of a ruler at the top of the format to aid you with column width and page margins.

When the ruler is on:
- Right mouse click to select the units being inches or centimeters, see screen shot above. Any pages using the WC command (Width of Column) operates in inches.
- To check the width of a column, right click on a cell, select Format > Column > Width, the width is shown in the selected units.

Example below is shown where inches have been selected

The features of the ruler include:
- Page margin. A blue indicator is displayed to mark the right hand edge of the printable area, based on A4 page width and selected margin size.
- A column that does not print, for example if it has a Column Suppress command in it, is excluded from the scale of the ruler. The ruler shows as a grey shaded area for the width of the non-printing column.
- A column which contains a Width of Column (WC) command may have a variable width depending on the data at the time of printing. In this case the ruler indicates this by using taupe shading. The scale shown in the taupe shaded section of the ruler may be different to the scale used elsewhere on the ruler.
- A column which uses the ColumnFlex command displays with its minimum width in the ruler.