Travelling and Restoring Client Data for CCH Accounts Production

The following will refer to your main CCH Central database as the office database and the travelled database as the offline database.
How to 'travel' client data
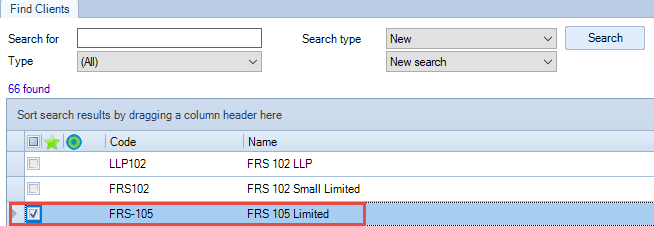
- To travel client data, click the Clients button on the Toolbar at the top or bottom of your screen to display the Find clients window.

- Find the client you want to travel and select the check box to the left of the client code
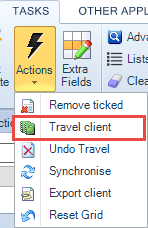
- From the Actions drop down on the ribbon, select Travel client.
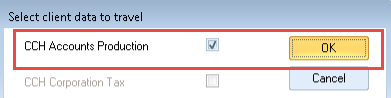
- The following dialogue will be displayed and the client data that is available to be travelled (or “taken offline”) will be listed. Select the data to be travelled and select OK.
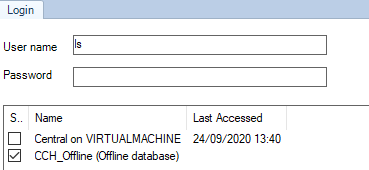
- A local copy database is created, CCH_Offline (Offline database), and a confirmation message displayed once the process is complete.

Accessing 'travelled' client data
Following the successful travel of a client, the next time you log into CCH Central, on the computer on which you travelled the dataset, you will see the travelled client marked as CCH_Offline (offline database) in the list. You may travel any number of clients, all will be stored in the CCH_Offline database for use out of the office.
- To access, select the Offline database and log in on the local computer.
- You can now work on the travelled client in the same way as you would if it were in the main database.
While a client is travelled offline, the client's data in the Office version of CCH Central becomes 'read only', and no changes can be made to that client.

Setting-up CCH Central homepage controls for travelled data
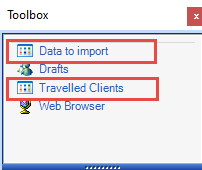
There are two homepage controls for travelled data:
1. Travelled Clients, and
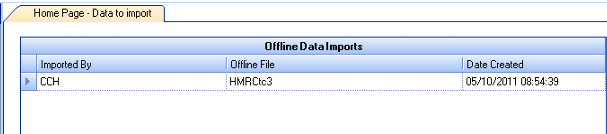
2. Data to import. Lists any restored travelled data where any changes to CCH Central records have not yet to be reviewed and accepted.
To set these up, from the HOME screen ribbon choose a View, click Customise to open the Toolbox.
From the Toolbox, choose the Central drawer, select the Data to import and Travelled Clients homepage controls to a clear area on the homepage, resize by dragging the borders as required.
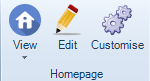
To rename the homepage click on Edit (pencil icon) on the ribbon, click onto its current name, rename and save. To close the Toolbox, click the red cross in the top right corner of the Toolbox.
To view your travelled clients - Go to the Travelled Clients homepage control.

To view Data to import - go to the Data to import homepage control.

Travelling an offline client back into the office database
Once you have completed your work offline, to travel the client back into the office database, log in to the CCH off-line database.
Select the client from the Find Clients window and from the Actions dropdown on the ribbon select Synchronise.
Apply the change within the office database
Then you will need to apply the changes from the offline into the office database. Go to the Central Homepage Data to import, and follow steps 1-4 below.
- To review the changes, double click the entry and a new tab is displayed listing any changes that have been made to the Central data while offline.
- To accept the changes, click Apply in the Task Bar.
- If you do not want the local changes reflected in the office Central database, click Cancel changes.
- Your instruction will be processed, the tab closed and the record will be removed from the homepage control.
Restoring Travelled Data
To restore travelled data, open the Central data set containing the travelled client and select File > Synchronise from the menu. The system will merge the updated travelled data into the office database displaying a progress messages as it proceeds. At the end of the process it will back up the offline database in case you need to access it later. Finally, the offline Central data set is removed from the list of available data sets.
After restoring the travelled accounting data, it is necessary to synchronise any changes made to the Central contact records. This is done using a homepage control that displays a list of any restored clients where changes to the Central records have not been reviewed and accepted.
Adding Central homepage control
To add the homepage control, ensure that the current homepage displayed has space to hold the control, select Customise homepage from Other tasks in the toolbar and a Toolbox will appear.

If the Central controls are not visible, click on the Central button. Drag the Data to import control to a clear area on the homepage and resize it by dragging the borders as required. You can rename the homepage by clicking on its current name in the Task Bar under Views. Close the Toolbox using the close button identified by the red cross.
Using the homepage control
This control lists any restored travelled data where any changes to Central records have not yet to be reviewed and accepted. To review the changes, double click on the entry and a new tab will appear listing any changes that have been made to the Central data while offline. To accept the changes click on Apply from the Task Bar. If you do not want the local changes reflected in the office Central database, click on Cancel changes. You instruction will be processed, the tab closed and the record will be removed from the homepage control.