Extra Fields and Categories

Extra fields
Extra fields are used to store additional information about a contact, client, employee, supplier or assignment that is not held anywhere else in the system. The value for a custom field has to be entered for each contact, client, employee or supplier; you do not select from a pre–defined list.
Use extra fields for any unique information you want to record for a contact/client/employee/supplier/assignment that does not have a set of values that can be defined, for example an identification number, a date a letter or communication was received, passport number.
These fields allow you to sort, group and filter information in your database or generate reports.
Extra fields are displayed in the Contact, Client, Employee or Assignment window under the Extra tab.
An Extra Field is identified by this  icon.
icon.
Extra fields category
Extra field categories are used to record additional information about contacts, clients, employees and assignments that is not held elsewhere in the system. They allow you to sort, group and filter information in your database.
Extra field categories are a definable list of fields and their associated values that can be used to define and categorise your contacts, clients, employees, suppliers and assignments to make the information easier to work with and analyse.
It is a way of dividing your database into logical groups. A extra field category consists of a category name and a number of associated values. You can define whether a category is to be available for contacts/clients, employees and assignments or all.
Extra field categories are displayed in the Contact, Client, Employee or Assignment window under the Extra tab.
For example, you may set up ‘Business Size’ as extra field category with the following values: 'Micro', 'Small', 'Medium' and 'Large'. When populating the record for each client or contact,go to the Extra tab, from the line ‘Business Size’ click on the value cell to bring the drop down which will contain the values setup.
When generating a report you could select, ‘Business Size: Small’ to report on and only those clients who are Small (i.e. the information which is in the Extra tab). You could also use this to select clients by the type of business you do for them, or by the team member who looks after their account.
An Extra Field Category is identified by this ![]() icon.
icon.
How to setup an Extra Field
- On the main menu click File > Maintenance > User Defined > Extra Fields
-
The window is split in two grids as shown below.

-
At the top row add the name of the Extra Field, for example PAYE reference or Pension provider
-
Click on the Category/Field column, from the drop-down list choose whether it is a Field or a Category:
-
A Field records one piece of information.
-
A Category records a list of options set up by you. For example: if the extra field is Pension Provider, the category will define values for this field which could be: Nest, The People's Pension, Not Enrolled, etc.
5. Click on the Group column, from the drop-down list choose which Extra Field Group the Extra Field belongs to.
6. Select the check box in the Is Mandatory column if you want the field to be mandatory in all areas where it is displayed.
7. Click on the Data Type, from the drop-down list choose the type of data which will be recorded:
-
AField records one piece of information which can be set as a flag, a text, a date or a number.
-
A Category records a list of options which can be set as a flag, a text or a number.
8. Select the check box Personal Data when the Extra Field relates to personal data. The icon ![]() will appear when the field is displayed.
will appear when the field is displayed.
9. Select the check box in the Allow Multiple if you want to allow the user to choose more than one option under the category field. Following the example above: if Allow Multiple is checked then the user could choose more than one option.
10. Select the check box in the Inactive when the extra field is not in use.
11. At the bottom grid, on the tab Applies To, select the boxes of the areas where you want to display the Extra Field. You must choose Contact and the other areas you want it to be displayed.
12. If the Extra Field is a Category, at the bottom grid, on the tab Values, add the options of the Category at the top row as below. If you want to have one of the values as default check its box.

13. Press enter to save the setup of the Extra Field.
14. Click OK to save the data and close the Extra Fields windows.
15. To set up additional fields repeat steps 1 to 14.
Caution! You must be careful when editing or deleting an existent Extra Field to prevent loss of information.
When an Extra Field is not in use, check its Inactive box to hide the field from the areas where it was setup to be displayed
Deleting an Extra Field
-
On the main menu, click File > Maintenance > User Defined > Extra Fields.
-
If the Extra Field contains information somewhere on your database we strong recommend to make the Extra Field Inactive instead of deleting it.
-
In the Extra Fields window, to select the field to delete, click the blue margin cell next to the field. The row appears selected.
-
Press the [Delete] key on our keyboard. You are prompted with the following message.
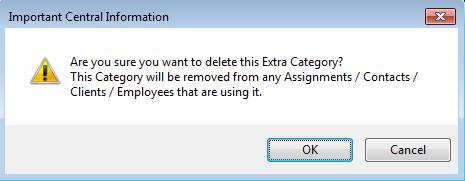
5. If you are sure you want to delete click OK on the message above. The field is delete.
6. When you have finished, click OK to save the changes and close the window.
Inactive Extra Fields
Users can hide the extra fields that are applied to Client, Contact, Employee, Assignment and Supplier by using the Inactive option from the Extra Fields screen.
To set an extra field as Inactive:
- Open the Extra Fields screen from File > Maintenance> User Defined
- Highlight the relevant extra field, then tick the Inactive check box.
- Click OK to save the changes.

Any extra fields can be marked as Inactive, including mandatory or in use extra fields.
Note: Inactive extra fields are still available in CCH Smart Reports, CCH Workflow, CCH Reporting and CCH Document Management.
The extra fields that are set as Inactive are no longer displayed in the following areas:
- Extra tab from Client/Contact/Employee/Assignment/Supplier screen.
- Extra Fields tab from Add New Client/Contact/Employee/Supplier Wizard.
- Values tab from Bulk Update Wizard within Find Clients or Find Contacts screen.
- Bulk Update Extra Fields dialog within Find Clients or Find Contacts screen.
- Insert Merge Field from Mail Merge Wizard when editing or creating a new template on Find Clients or Find Contacts screen.
Note: Inactive extra fields that were added previously in a template, are still displayed in the document but without values after the Mail Merge Wizard is performed.
- Merge Fields section from Email Templates when editing or creating a new email template on Find Clients or Find Contacts screen.
Note: Inactive extra fields that were added previously in an email template are still displayed in the template but they are no longer available as Merge Fields.
Users can view the inactive extra fields in the Extra tab within Client, Contact, Assignment, Employee and Supplier screen by selecting the Include Inactive Extra Fields option at the bottom of the screen.

Extra Fields Security
The Hide option is available in the Extra Field Security screen located within File> Maintenance> Security> Extra Field Security allowing users the ability to control the view access to the Extra Field Groups.
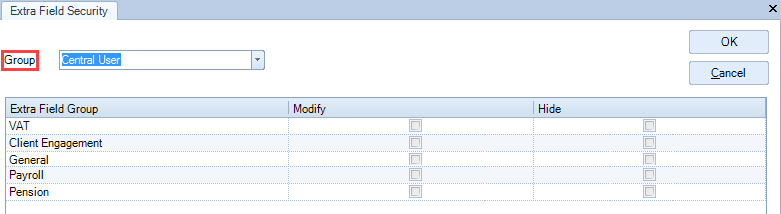
To set the Hide option on an Extra Field Group:
- Open the Extra Field Security screen from File > Maintenance> Security.
- Select an employee security group from the Group list.
- Highlight the relevant extra field group, then tick the Hide check box.
- Click OK to save the changes and close the screen.
The extra fields that belong to a group that was set as hidden, are no longer displayed in the following areas:
- Extra tab from Client/Contact/Employee/Assignment/Supplier screen.
- Extra Fields tab from Add New Client/Contact/Employee/Supplier Wizard.
- Values tab from Bulk Update Wizard within Find Clients or Find Contacts screen.
- Bulk Update Extra Fields dialog within Find Clients or Find Contacts screen.
- CCH Reporting
The extra fields from an Extra Field Group that has the Hide option ticked for a user group in the Extra Fields Security screen are still available in the following areas:
- CCH Smart Reports
- CCH Workflow
- CCH Document Management
- Insert Merge Field from Mail Merge Wizard when editing or creating a new template on Find Clients or Find Contacts screen.
- Merge Fields section from Email Templates when editing or creating a new email template on Find Clients or Find Contacts screen.
Note: Where a user is allocated to a security group that has the Hide option ticked for any Extra Field Group, they will not be able to view the Extra Fields for that Extra Field Group.
Note: The Extra Fields that belong to the Extra Field Group NONE are visible to all security groups.