CCH Corporation Tax 2015.3 - User Guide

Getting Started
Login
After CCH Corporation Tax IE has been installed on your machine, you will see the  icon on your desktop. Double click on the icon and the Login window will appear, see below:
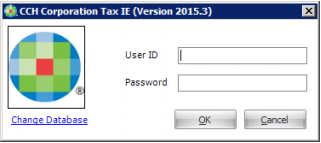
Enter User ID and Password and click on the OK button to login. If the details are invalid you will get the following message:
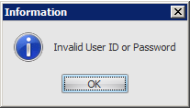
Click on OK, it will return tto the login window (above). Re-Enter your User ID if you get the same invalid message (above), check your credentials with the System Administrator. System Administrator would be practice Manager or partner, they can login in to check staff login ID’s.
Note: the default login is SYSADM no password
Product Registration
The system will not run until it is registered. Following installation, when you first login, the CCH Corporation Tax IE product registration window appears:
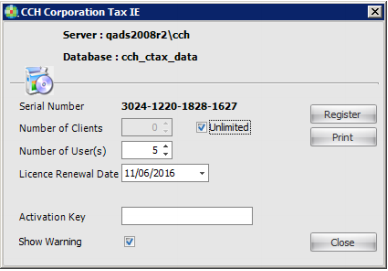
Information: You will need to email your Serial Number to our Licensing department using the following email address: cchsoftwarepinrequests@wolterskluwer.co.uk
You will then receive a reply email from our licensing department containing the information to be input as follows:
- Number of clients: This will not be limited - select the "Unlimited" checkbox.
- Number of User(s): Input the number of users for which you are licensed, from the email.
- Licence Renewal Date: Input the next future licence renewal date, as shown in the email.
- Activation Key: This will be provided in our reply email in a format similar to the Serial number; please note that the hyphens must be included when inputting it.
- Show Warning: Tick to receive one month’s notice when the licence is due to expire.
- Register: Finally click the Register button. Your product should now be registered and ready for use.
When the next renewal date is reached, you will need to renew your licence. One month in advance of the renewal date the system will remind you to email us again for a new Activation key. The product registration window (as shown above) can be accessed at any time from the menu bar in the software: Click Tools > Registration to display it.
Main Program Window
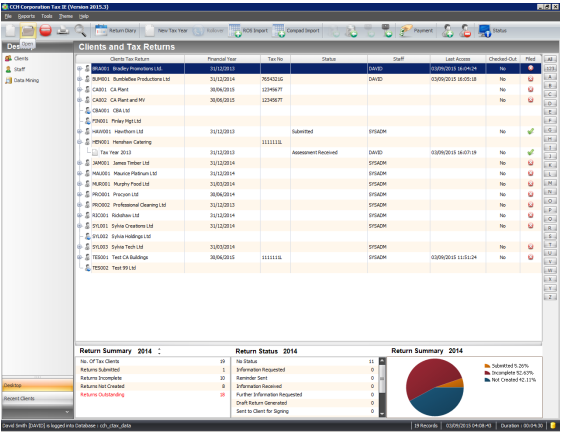
CCH Corporation Tax IE opens on the Clients and Tax Returns window.
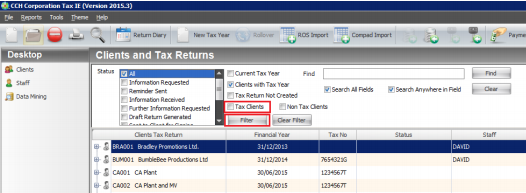
Click on the Magnifying glass on toolbar. You will then see a list of tick boxes which you can use to filter the Clients and Tax Returns window (outlined in red below).
The Return Summary dashboard (see below) allows you to keep track of returns for the current year. This is useful as you can see the status of returns for accounting periods ending in any year without having to go through each return to check its current status.
The Return Summary Year on the Dashboard can be changed by using the up and down arrows beside Return summary on the right.
How to Navigate CCH Corporation Tax IE
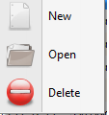
The tax package does not have many shortcuts. The right click option on browse windows will allow you to create new, edit and delete records.
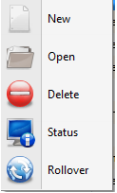
On the Clients and Tax Returns window view the status of a client's tax return can be changed by right clicking. You can also perform a tax year rollover from this menu. (See below)
Columns can be sorted (where relevant) by right-clicking on column header (See below).
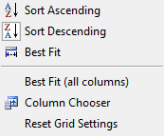
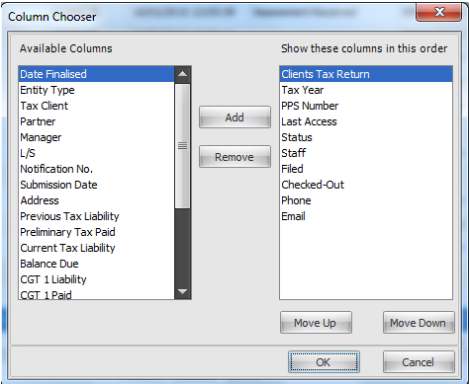
You can filter (where relevant) columns as well as change column widths, Additional columns can also be selected using the Column Chooser option (See below).
- Double-clicking will generally bring you into a drill down facility where appropriate.
- Click on hyperlinks (to add new database items or to expand the information). Blue or blue underlined text indicates a hyperlink to a smaller database or lookup. Use the Find option (magnifying glass icon on toolbar): clicking a second time turns it off.
- Use Fast Search (on long browse screens): click anywhere on the screen and begin to type client name
- Help - the help menu contains a couple of important options to help you when you contact our support department.
Help
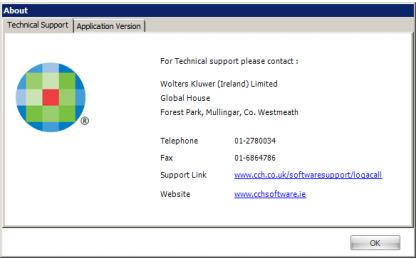
The help menu contains some important options to help you when you contact Support. Support Information, the third option on the dropdown list gives details of how to contact Support. The application Version tab shows the current version of the application that you are running - you may be asked for this information if you contact Support
User Access Group
When you enter the software for the first time, you will use the default system administrator account. Once Access Groups have been defined you can apply access to individual staff members. Using access rights you can restrict routines and apply passwords on individual clients.
Defining User Access groups
On the navigation bar click on Tools, choose the User Access Groups option on the dropdown list. (see below)

The User Access Groups window will open. - it will be blank as no groups have been setup.
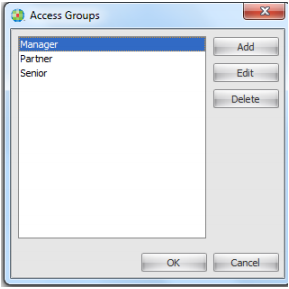
To add a group, click Add. The Access Group window appears.
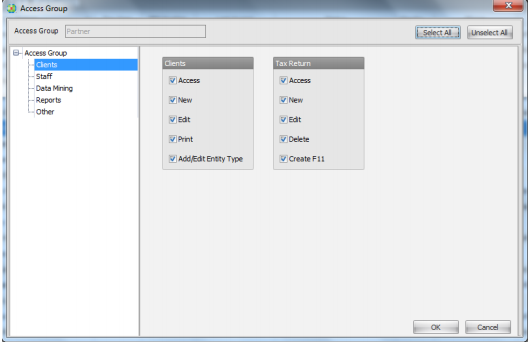
Enter a name for the group were it says Access Group (above) and tick on the options you want available to the group you are creating. To apply an access group to a staff member go to the staff section and edit the staff members details and apply.
Add Staff
To add Staff, click on the Staff option on the navigation pane to the left of the window (See Figure 9 below) Figure 9 The Staff window will open. Click on the New icon on the toolbar (See Figure 9.1 below) or right click anywhere on the window and a dropdown menu with new and open will appear. Figure 9.1 Fill in the details requested relating to the new staff member on the Staff window(figure 9.2 below), always tick the Tax User box. Once relevant information has been filled in click on OK.
Staff Code: The staff code that you input here will become the User ID for logging in. It will also be displayed on the Status window. We would normally suggest using initials but you can use your staffing structure that you may have in place. Name: Simply enter staff member’s name. This is also a hyperlink (underlined and in blue,) if you click on this you will see the window as in Figure 9.3 any information added is saved to the database.
Type: This refers to staff type the dropdown will allow you to choose from: Partner, Manager or other. Grade: This refers to grade within the company options are Partner, Manager, Senior, Junior, Accounts. System Administrator: (Need to check what sysadm access is on PTax). Tax User: Ticking this will activate the staff code for logging in. Once the staff code has been activated, this is now the user ID for logging in.
Add a Client and Tax Year
New clients can be added through the Add button on the toolbar or by right clicking on the Clients and Tax Returns window and choosing new. Also on the toolbar you can use the ROS Import button which will automatically load your client information from their previous years CT1 ROS xml file. This can save considerable amount of time and effort as it will import all the relevant information to CCH Corporation Tax IE. Please note that this will import the information into the year that the CT1 relates and you will then need to do a rollover. See below for details.
To add a new client and Accounting Period, click New  from the toolbar. New Client and Tax Year window appears as follows:
Add the following details: Entity Type: Select either Company Limited by Shares or Company Limited by Guarantee Client Code: Client codes can be input manually or automatically created. In case of automatic coding, each code may be broken up into several segments. The client code can be based on up to six criteria, i.e. client name, office, partner, department, Manager and a unique number generated by the system. For further details, refer to the Settings section. Name: Enter the name of the client Company. Partner: Select the name of the partner in charge of this client from the drop-down list. Alternatively, click the hyperlink to display the Select Partner window. Select a partner from the list. Manager: Select the name of the Manager from the drop-down list. Alternatively, click the hyperlink to display the Select IE window. Select a Manager from the list. Lead Staff: Select the lead staff from the drop-down list. Alternatively, click the hyperlink to display the Select Staff window. Select the lead staff from the list. Business Type: Select business type from the drop-down list. Alternatively, click the hyperlink to display the Business Type window – you can select an existing business type or add a new one. Password: Enter the password for the client. System will ask for the Password if you try to edit the client. Note passwords are not mandatory. Confirm Password: Enter the Password again to confirm and save it in the database. Start Date and End Date: Input the Start and End dates of the Accounting Period. You can add AP's from 2008 and currently up to 2015 but each year will be added in annual updates.
Tax Client: This must be ticked in order for the company to be displayed in the Clients and Tax Returns window. To save the client details, click OK.
Add a New Accounting Period
For existing companies, you can add a New Accounting Period from the Clients and Tax Returns window by highlighting the current tax year, right click and choosing new. The Add Tax Return window appears (see Figure 11). Figure 11 It will display the Entity Type, Client Code and Business name. You can enter Password and Confirm Password to restrict access to the client company's tax return information. Input the Start and End dates of the new accounting Period. Click ok to save the details. A new Accounting Period tax return will be generated for the client.
CCH Compad Import
For instructions on how to convert your existing client database from Compad to the new CCH Corporation Tax IE see the separate CCH Compad Data Conversion Guide included as part of the documentation on the CCH Corporation Tax IE download page.
ROS Import
The ROS Import option allows you to find and select client company's ROS CT1 file(s) and import their information into the CCH Corporation Tax IE database. Firstly you will need to setup your default Path for CT1 Files. To set this up go to Tools, Settings and then select the Tax Details Tab.
Enter the Path for CT1 Files, or use the hyperlink to browse to its location. Once a file path has been entered click OK You can now click on File, ROS Import from the dropdown menu: Figure 12.2 Alternatively click the ROS Import button on the toolbar:
When you click on ROS import the following window will appear. Figure 12.4 The system will list all of the CT1 files in the specified folder and its sub-folders. If you have other directories and not one master directory you can click on the “Search for CT1 files” button and select the XML folder path using browse for folder as seen below.
The list of all xml files automatically appears in the window with imported flag set to ‘No’ if the imported flag says ‘Yes’ this CT1 has already been imported into CCH Corporation Tax IE. To add a CT1 double click on file or click on ROS import button. The following window appears.
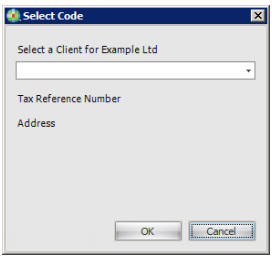
The Select client window (above) will default to the appropriate client company if the CT Reference number agrees. If Corporation Tax IE cannot link automatically to a client in the database you will need to manually select the client to which the CT1 file relates. To manually select a client code, click on the dropdown arrow, choose the client company, and click on OK. The xml file will be imported into the selected client. Once you select the client code, the CT Reference number and address will be displayed. When the xml file has been completely imported the imported status will change to ‘Yes’.
If no Client is selected you will be prompted to enter in client information to add a new client. Clicking on the ROS Import & Rollover button, will import the XML files and perform a tax year Rollover. This will do exactly the same as the ROS Import button but it will also create a new blank Accounting Period for the client. Use find tool to search for a client's form CT1. Use Refresh tool to refresh the list of xml files in the import window based upon the path selected.
Rollover
The rollover option will allow user to move the client current Accounting Period into the next Accounting Period.

Select the tax return to be rolled over, then click the Rollover button on the clients and tax return browse to create a new Accounting Period (See Figure 13). When the Rollover button is clicked on an existing Accounting Period the following message will appear. Figure 13.1 Click OK and once the procedure ends, a new Accounting Period will have been generated for the company.
Note: the status must be set to ‘Submitted’ before a rollover can be run on a company’s tax return. To update the status on a return simply right click on the return in the browse and click the Status option or click the Status button on the toolbar.
Status
To view the Status on a tax return, first select the tax return and then click the Status button from Toolbar. Figure 14 Client and Personal Tax Year Status window appears as follows.
The Clients and Corporation Tax Year Status window shows the workflow tasks as listed on the left side of the window. Tasks can be marked Completed only if the previous Tasks are also marked as Completed. The different status types available are ‘Not Started’, ‘In Progress’ or ‘Completed’. The Staff member responsible for the Task and the Completed date can be selected. The Staff name will automatically default to the user logged in but this may be changed by clicking on the down arrow. Similarly the date will default to today’s date. The note column allows staff to enter text to reminder/ alert other staff members of outstanding items etc. Only when the Status “Submitted” is set to Completed the system will allow performing rollover routine.
Tools - Settings
From the Tools menu, choose Settings. The Settings window will open.
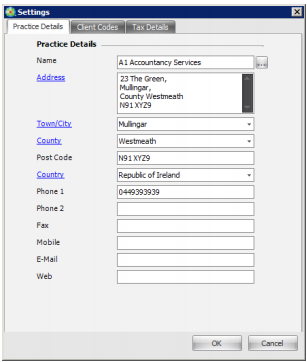
Practice Details tab.
Enter the name of the practice and the contact address along with the contact phone numbers, mobile and fax numbers, e-mail and web address. This information is used as the contact information for the Revenue when queries arise and also for email responses.
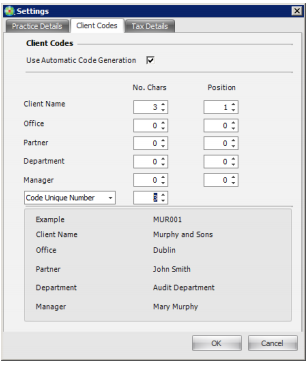
Client Codes tab
Select the Use Automatic Code Generation check box, if you want the client codes to be automatically generated by the system, when entering new client company details. Each code may be broken up into several segments. The client code can be based on six criteria: client name, office, partner, department, manager and a unique number. This unique number may be system unique or it may be code unique.
Tax Details Tab
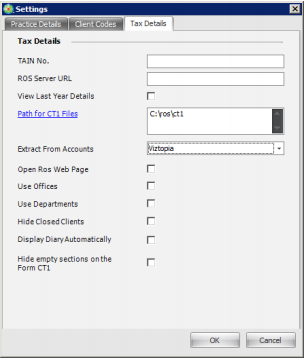
The following information is critical for the proper setup of your Corporation Tax IE package:
- TAIN No: Enter the TAIN Number of the Practice. This is your official TAIN as issued by ROS.
- View Last Year Details: This will show the previous Accounting Period’s figures alongside the current year for comparison on the schedules.
- Path for CT1 Files: Input the location where you want to store .ct1 files. Click on the hyperlink to browse to the location.
- Extract From Accounts: Select Viztopia to enable the import of Accounts Extract data from Viztopia Accounts Production.
- Use Offices: Select the check box to enable ‘Use Offices’ option.
- Use Departments: Select the check box to active ‘Use Departments’ option.
- Hide Closed Clients: To hide the closed clients in CCH Corporation Tax IE application select this check box.
- Display Diary automatically: If this is selected, the Return Diary feature will be activated automatically every time you log into the system
- Hide Empty Sections on the Form CT1: Select the check box to hide any sections on the Form CT1 displayed that do not contain any data input
Change Database
The Change Database option in the Tools menu allows the user to work with multiple databases and change the database from within the application. This is very rarely used and is not a free option. It is also handy when not sure what database you are currently connected to. From the Tools menu, choose Change Database option. The Change Database window appears.
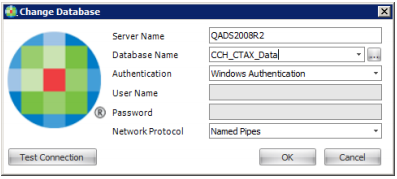
Enter the following details:
- Select Name - Enter the server name in which the database you want to change to resides.
- Database Name - Select the database you want to change to.
- Click OK, you will be asked to re-launch the programme.
Themes
Themes allow the user to change the appearance of the entire application including menus, buttons, backgrounds etc. The default Theme for CCH Corporation Tax IE is black. Simply select the theme you wish to apply and it will be automatically applied to the application.
Backup/Restore

The backup routine allows the user to back up a single client tax return to a local pc or memory key. If you have a laptop or home desktop with a blank local copy of CCH Corporation Tax IE installed. This allows you to take details of a client’s tax return home to work on. The Backup window will appear as follows:
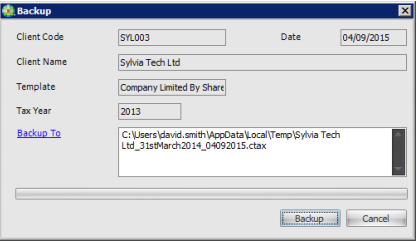
If you click on the backup hyperlink you can point to where you want the backup saved. Click Backup and a message will appear “Backup Completed”. If you look at the backup location you chose it will have a .ctax file saved.
Restore will perform the reverse routine. Only difference is on the Restore window you are pointing the programme to the backup of the file to be restored back into CCH Corporation Tax IE and will update the database with the new information.
Check-Out/Check-In

The check-out routine works in a similar way as the backup routine. When you check out a tax year the company's tax return is now locked on the system so that nobody can change the details until the tax year is checked back in. The tax year can be opened in read only mode by other staff members while it’s checked out. The Checkout window will appear as follows:
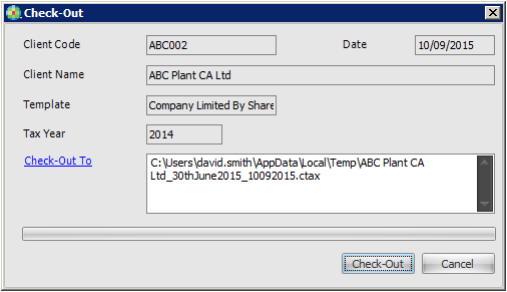
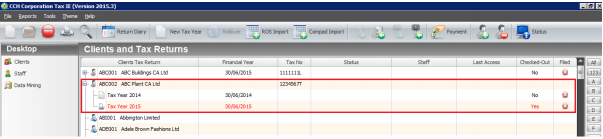
Same as the Backup routine, if you click on the 'Check-Out To' hyperlink you can point to where you want the checked out data saved. Click the Check-Out button a message will appear “Check-Out Completed”. If you look at the Check-Out location you chose it will have a .ctax file saved. The Checked-Out column on the Clients and Tax Returns window will have the word “Yes” filled in. The tax returns will also change colour from black to red to indicate is has been checked-out (see below).
Check-In will perform the reverse routine, only difference is on the Restore window you are pointing the programme to the Checked-Out file to be restored back into CCH Corporation Tax IE. This will take the client out of the locked state and will update the database with the new information.
Payments
Figure 19 Select and Accounting period record; then select the payment button from the toolbar. The payment window opens: Figure 19.1 It displays the following information for the Accounting Period selected and the following period: Preliminary Tax Paid Balance Paid CGT1 Liability CGT1 Paid CGT1 Balance CGT2 Liability CGT2 Paid CGT2 Balance Enter the amount you have paid as Preliminary Tax, Balance Paid will be the difference of Current Tax Liability less Preliminary Tax Paid.
Expand All/Collapse All
Figure 20 As the number of returns on the system hits hundreds of returns it is often helpful to collapse the main client and tax return list. This effectively displays just the client list with the client’s most current year displayed. Expand will reverse this and show all clients and all tax returns.
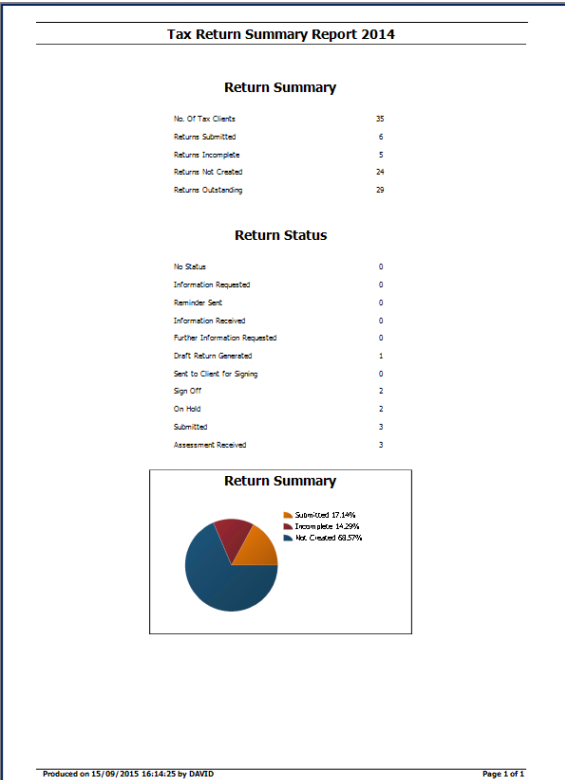
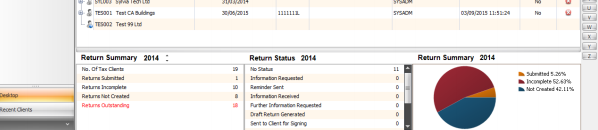
Return Summary Dashboard The Return Summary window will updated as you process information. It will inform users how many returns have not been created yet, how many are incomplete etc as follows in Figure 21.1. The middle Return Status panel will quickly show you how many of your current year tax returns are at different stages of completion. The last section is a graphical representation of the status for CT1’s.
Search There are three ways to search for clients, as below in Figure 22: 1. The Fast search. This is activated as soon as you begin to type part of the client name while in the clients and tax return browse. 2. If you cannot find the client using the Fast search feature click on the magnifying glass button on the toolbar and you can search the full list using all fields. a. There is also a filter option on the Search panel which allows you to further reduce your search criteria by : Status Tax Year Tax Client 3. Alphabet search on the right of the panel. Simply click on a letter to see the entire client starting with the letter chosen.
Corporation Tax Return Form CT1
The tax return schedules are made up of the following sections: Company Details Trading Results Extracts from Accounts Irish Rental Income Irish Investment and Other Income Foreign Income Exempt Profits Capital Gains Chargeable Assets Deductions, Reliefs and Credits Research and Development Credit Capital Gains (Development Land) Profit/Gains on Rezoned Lands Close Company Surcharge Recovery of Income Tax Dividend Withholding Tax Property Based Incentive CT Self Assessment CGT/ IT Self Assessment
Every section will have a number of subsections, each of which contains information which must be completed depending upon the complexity of the client’s tax return. Some of the sub sections have additional drill-downs into the schedules where you can add a breakdown on a particular figure, an example of this is Irish Rental Income under Gross Rent Receivable
Company Details
When you add a new Accounting Period or double click onto an existing Accounting Period the following window will appear: Figure 23 The layout and content of the above pages are very familiar to users of the Revenue Offline application. It allows for an easy transition. Simply choose a section and go through each page by using the Back and Next buttons. If you have converted the data over from an CT1 file the information will just need to be edited to complete the return. The above window shows an example of where sections have been filled in, i.e. there are ticks beside all of the tax return areas that have been already been completed. The system has a series of alerts and messages as well as validation errors where information has not been entered properly or completely. Click on Company Details link and the following window will open (See Figure 23.1). Complete all the information required.
| Name of Company: | Enter the name of the client. |
| Tax Reference No: | This is mandatory information for filing the Tax Form. This is an eight digit unique number in which the first 7 numbers are digits and ending in a letter. |
| Cessation Date: | If the company has ceased trading during this tax year then the date can be specified by using the date selection option on this screen. |
| Company Accounting Period: | Enter accounting period for the return |
Note: continue to complete all the information you deem necessary to complete the Company Details section for your client. You can click the Next button to go onto the next sub section. If you click Home it will bring you back to the start of the section you are on.
Trading Results This section provides details of any income or expenditure from the company’s trading for the year. Figure 24 Click on the Trade Profits chargeable link to start inputting basic data relating to profit/loss for the accounting period. You will also see a Capital allowances schedule link which displays the window below:
Extracts from Accounts This section enables you to input accounts data, or to declare the iXBRL filing options that apply for this Accounting Period. Figure 25 Under ‘Extracts from Accounts’ the following tabs are available: • XBRL • Income • Trading Account Items • Expenses and Deductions • Balance Sheet and Capital Reserve Items • Adjustment made to Profit / Loss per Accounts • Notes to the Accounts • Additional Notes This data can be input manually or , if you scroll to the bottom of the window, you will notice an Extracts Accounts From CSV/TXT file button; this is to enable you to import “Extracts from Accounts” data files created in Viztopia Accounts Production.
To enable this functionality, first select Viztopia from the dropdown field shown below (in Tools, Settings menu).
This will then enable you to browse to the location of the Accounts data file and import the information directly into the system.
Note: continue to complete all the information you deem necessary to complete this section for your client. You can click the Next button to go onto the next sub section. If you click Home it will bring you back to the start of the section you are on.
Irish Rental Income
This section has three main subsections. They are as follows: Rental Income from land and property in the state Rental Capital Allowances Excess Rental Capital Allowances for the offset against their income Figure 26
IRISH INVESTMENT AND OTHER INCOME
This section has four subsections. They are as follows: Interest arising in the State Other Irish Income Clawback in respect of Research & Development Activities Distribution received from Companies resident in the State Figure 27 By selecting this section from the tree view you will be presented with this screen with the sections to complete as follows.
Interest Arising In the State
There are two fields in this section that can be filled in accordingly. Gross Interest received or credited under deduction of Irish tax. Gross Interest received or credited without deduction of Irish tax.
Other Irish Income There are a number of fields that can be filled in here if applicable to your client; however there is also a sub section drill-down available in this section. Figure 27.1 By clicking on the blue hyper link “Investment Undertakings” the following screen will appear.
There are 3 options on this screen Add, Edit and Delete. These relate to the details in the grid below them on screen. Pressing the Add button will make additional fields appear relating to the investment details. For details see below.
Once these details have been entered, pressing the “Add” button again will submit them to the grid. The below screen shows the details within the grid once they have been added.
Edit Button: To edit details that have already been entered an submitted to the grid on this screen, pressing the edit button will allow you to change these details. Once changes have been made, pressing the add button will submit these changes back to the grid again. Delete Button: To remove an entry from the investments grid, highlight the entry by clicking on it with a left mouse click and then press the delete button. This will remove the selected entry from the grid.
Note: continue to complete all the information you deem necessary to complete this section for your client. You can click the Next button to go onto the next sub section. If you click Home it will bring you back to the start of the section you are on.
Foreign Income
This section contains 5 sub sections 4 of which contain grids that details can be entered like previously mentioned in the Irish Investment and Other income section. Figure 28 The first section is “Foreign Income excluding Foreign Life Policies & off shore funds “this subsection, simply contains 3 fields where the data can be entered and one total field that will automatically update based on the 3 numeric fields above it. There are no drilldowns or data entry grids in this sub section.
Exempt Profits There are 2 subsections within this main section: Woodland fees and Greyhound Stud fees. Figure 29
Note: continue to complete all the information you deem necessary to complete this section for your client. You can click the Next button to go onto the next sub section. If you click Home it will bring you back to the start of the section you are on.
Capital Gains
This section outlines any Asset Disposals that your client has undertaken from Shares, Land & Property to Foreign Life Policies. Figure 30
Note: continue to complete all the information you deem necessary to complete this section for your client. You can click the Next button to go onto the next sub section. If you click Home it will bring you back to the start of the section you are on.
Chargeable Assets
This section covers any assets acquired during the tax period. Simply fill in the information in each section.
Deductions Reliefs and Credits
This section allows you to fill in details regarding any reliefs or credits due in this tax period.
Research and Development Credit
Research and Development Credit contains the following sub-elements as ‘Research and Development Credit’ and ‘Claim for Payment of Excess Research and Development Tax Credit’
Capital Gains (Development Land)
This section contains details of any assets disposed of or acquired regarding development land. Figure 34
Note: continue to complete all the information you deem necessary to complete this section for your client. You can click the Next button to go onto the next sub section. If you click Home it will bring you back to the start of the section you are on.
Profits/Gains on Re-zoned Lands
CT1 returns with details in this section must provide a completed Self Assessment of their Income Tax Liability. This is done by returning the IT related fields on the CGT/IT Self Assessment section.
Close Company Surcharge
This section allows you to input details of Close Company surcharges arising A calculation facility is included for Section 440 surcharge on undistributed investment and estate income Figure 36
Recovery of Income Tax
There is a single screen for this section. Fill in the applicable details and use the desktop tree view to navigate to the next section.
Dividend Withholding Tax
There is a hyperlink on the main screen of this section which when clicked in is a drilldown to enter “Details of a Distribution made by the company” which can be seen on the screen below.
Once the hyper link is clicked it will produce the following screen allowing you to enter details of the distributions made. Figure 38.1 As in previous sections pressing the Add button will allow you to enter the details of the Distribution. Once the details have been entered pressing the Add button again will save the details you have entered.
Tip: pressing the Back button will bring you back to the main Dividend withholding tax screen.
Property Based Incentive
This section covers investments in property with specialist interests such as Park & Ride, Seaside Resort and Urban Renewal
CT Self Assessment
In CT Self Assessment Amount of profits or gains chargeable to tax for this period. This figure is populated with the ‘Total Income’ value displayed on the calculate screen on ROS. Figure 40
CGT/IT Self Assessment
CGT/ IT Self Assessment has two elements and they are ‘Capital Gains Tax Self Assessment’ and ‘Income Tax Self Assessment.’ By selecting each of the hyperlinks the sections will open to enter the figures. In Capital Gain Tax the amount of profit or gains chargeable to the tax period is appeared. This figure is populated based on the figures in the capital gains development land element. In income tax self assessment the figure is populated based on the figure supplied in the capital Gains Development Land element.
Calculation & Submission
Once you have completed inputting the tax return information and you are happy that you have completed each of the sections and subsections, simply click on the Calculate button on the tax return screen.
When you click the calculate button Relate Corporation Tax Manager will automatically go onto the internet and go to the Revenues Tax Calculation Engine and return a CT1 Calculation Report. The report is based upon figures returned from Revenue. The calculation uses the ROS web services to do a draft calculation, they are simply returned to the package so that the user can see what the client’s potential tax liability and return will be like.
Calculation Report
The calculation report created looks like the following: Figure 42.1 As per the window above the layout has been formulated to be in line with the Revenue Offline Application but has been improved to ensure that the layout stays on as few pages as necessary and that the fonts have been consistently applied.
Validation Error Report
The validation error report is created when something has been entered which cannot be returned to the ROS calculation engine. Self validations help to ensure that returns adhere to the Revenue's systems. The validation error report will appear as follows:
CT1
Once you are happy with the CT1 calculation report you can decide to view and print the full CT1 form by clicking on the CT1 button on the tax return screen. Figure 43 The CT1 Form will look like the following screen and will run to a few pages outlining every section that has been completed as well as sections that are not applicable.
The last page has the signing section and declaration which your client needs to sign. There is an option to create an export file to PDF for sending to your client for signing.
Submission
Once you are happy that the client has accepted the tax return and the tax liability, it is time to submit the return. Click the Create CT1 button on the tax return screen. Figure 44 The following message appears: Figure 44.1 This means that the software has generated a CT1 xml file in the default ROS CT1 directory. When you click OK the system can also be configured to automatically launch the ROS login screen enabling you to file the client's CT1 return.
Data Mining
Data mining is a tool used to interrogate the tax database of client information to help manage the tax return process. It is also used to target, sell and market the firm’s tax services. The data mining routine will give the user the ability to do complicated search and retrieve operations on the client database, e.g. create a list of all clients who have a profit in excess of €100,000 The user can create as many data queries as they like. To create a data mine click on Data Mining on the navigation bar. Figure 45 As in other areas of the system you can click New on the toolbar or right-click, then click New. The Query window appears showing the Details tab.
In the Details tab page, you have to specify the kind of query that you want to generate. Enter the following information: Description of Query Query Group - Select the group of the query from the drop-down list. If the group you are looking for is not a part of the list, then you can enter the name of the query group here. It will be added to the list, for you to use the next time. Source of Information–will give the option of Client or staff. Click on the Query Builder Tab. The Query Builder window appears showing the following: Figure 45.2 The Query Builder helps you define the information you are looking to retrieve from the database. The query statement appears at the bottom of the window. Select the section or field name that you are looking for, from the Field drop-down list. Then select the condition that you want to specify from the Condition drop-down list. Once that has been done, enter the value that you are looking for in the Value box. Select either “and” or “or” depending on whether you want all the conditions that you have specified, to be met or any one. Multiple lines can be entered here for detailed queries. Click on the Fields Tab to select or unselect the fields of information you want to appear on your data mine. These fields will be available for mail merge once the query is “run”.
Once you are happy with the created query Click Save & Close to retain your data mining results. To execute query, click the Run button as shown below.
The Query window will appear as follows: it lists up all the records in the database that fulfil the criteria set in the query builder. The user can now click on the Microsoft Word button and do a standard letter mail merge requesting or offering information to the clients listed. The user can click on the Microsoft Excel button and export the list into a perfectly formatted Excel Spreadsheet for further analysis. Figure 45.5
If you are on a network you may want to keep all of your particular saved queries in a directory so that they are available to all staff members. If you click the Settings button on the Data Mining window you can agree a network path.
Reports
There are two main reports which can be run from the text Reports menu: Client Status Report Return Status Report
Client Status Report
The Client Listing Report selection criteria are as shown below. Make the relevant selections you require such as give me a list of all clients with a status of “Draft Returns Generated”. Figure 46 The report will then list all clients with this status along with their other information.
Return Status Report
This report can be used as a summary report of which will give you an overview of how many returns you have at each of the available status. It can also be used to show more detail by selecting the “Detailed” option. This will enable you to tailor the report to show you the details broken down according to your specified criteria E.G show only the returns associated to a particular staff member. Figure 46.1 The summary report appears as follows: