Home Screen - Load Pack

After logging in, the system will display the list of clients stored in the database selected. This scren is called Home Screen Load Pack:
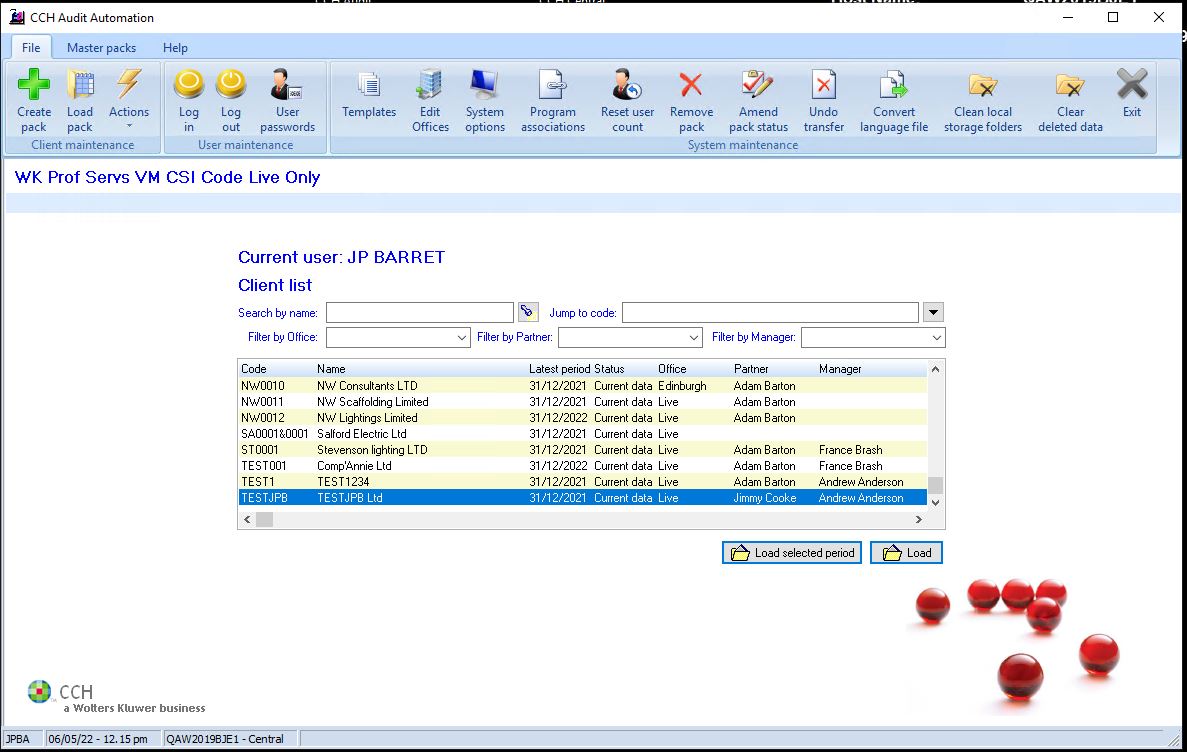
The Jump to code field will have focus and you can reposition the highlight by entering a code in the field, or by clicking on the name of a client. The system remembers the last 10 clients you have worked on will attempt to match the code as you type. The drop-down button displays this recently accessed list for you to select from. Once the correct client is highlighted, you can press <Enter>, to select it. You can also scroll through the list and select a client by double clicking on it. You may also use the Search by name facility to restrict the contents of the list. To do this, type part or all of the client name and click on the [Torch] button. The list of clients will be restricted to just show those containing the string entered within the clients’ names. To return to the full list, click on the [Full list] button that will appear.
Using the ribbon
Alternatively, you can at any time click on the [Load pack] button in the Ribbon.

The Load audit pack dialog will be displayed, inviting you to enter the code of the pack that you wish to work on.
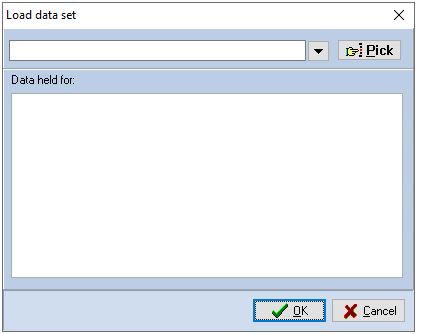
Load audit pack dialog
You may either type the code of the client pack, if it is known, or use the [Pick] button to select the code from a list of clients stored on the hard disk. See page 25 for details on how to use the code list feature.
The system maintains a list of the last 10 audit packs that were accessed on the computer. These are included in the drop-down list available from the code edit field on the Load audit pack dialog. The list shows the last client accessed first and as you type a code, the system auto fills the entry field if a match is found in the list; otherwise it just accepts your typing.
You can also use the up and down arrow keys to scroll through the items, or the drop-down button to select from the list.
The display will show the data held for the different accounting periods that are available for the client. Any period can be selected. Click [OK], if the data selected is not current data you will be asked to confirm that you wish to continue.
Using the Home Screen Load Pack
You can load a prior period by selecting the client and clicking on Load selected period. A dialog will appear listing the periods recorded for the client:
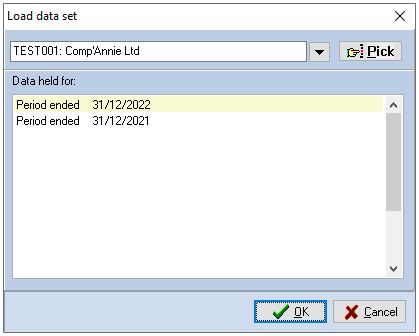
Double click on a period to load it, or select the period and click on OK.
If you have selected the wrong client, you can also switch to another client using the drop down or pick list.
If the code entered does not exist, the system will inform you of this fact and return to the Main window.
Clicking on the [Cancel] button of the Load audit pack dialog will close the dialog box and return you to the Main window without loading an audit pack.
Once you have selected a valid client the system will attempt to load it and display the client in the Pack window, any number of users can access each client simultaneously.
If the data you have selected is back-up data, you will be asked to confirm you wish to continue, with the following message:
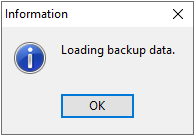
Click on [OK] and the system will proceed, however, you will only be granted an access level of 5, enquiry mode, as it would not be appropriate for data to be entered into a backup system.
If a third-party accounts programme link is in operation (see the System Manager’s Manual for information about setting up such a link) each time that a client is accessed, Audit Automation will look in the third-party directory for a transfer file. If a transfer file is present for the client, Audit Automation will ask you if you would like the TB to be updated from the transfer file, with the question:
Update TB from the Third_Party_Name export file?
(The actual name of your accounts programme will be displayed in the above prompt.)
If you confirm that you would like the update carried out, by clicking [Yes], Audit Automation will import the file, which may contain data for the current year and for past years, before renaming the transfer file and proceeding to access the client. If you indicate that you do not wish the data updated, by clicking [No], Audit Automation will proceed to access the client leaving the transfer file on disk and the client’s TB unaltered. In the latter case, the transfer file will remain in the directory and you will be offered the opportunity to update the client on the next occasion that it is accessed.
Switching to a different year for an open client
When a client is open the period end date that you are working on is displayed in the Processing period ended drop down list in the main tool bar. To switch to another period, select the period end from the drop-down list.

Note: It is still possible to have multiple instances of Audit Automation running if you wish to have both the current and previous period visible at the same time, or would like to have more than one client’s data open at the same time.