Navigation and Data Entry overview within CCH Accounts Production

Navigation overview
Navigation is simple within CCH Accounts Production, there is a Task Bar to the left of the screen which lists the different work areas (screens) within four folders and a ribbon along the top of each screen, which displays the actions available within the screen being viewed.
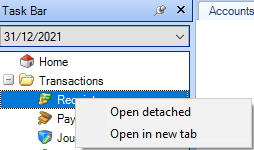
From the Task Bar, single left mouse click on an item, within a folder, to navigate to that screen, for example: folder Transactions> item Receipts, will take you to the Receipts screen.
If you wish you may right mouse click to open the work area as detached or open in a new tab.
Search boxes and navigation within formats
There are search boxes in some screens to speed up navigation, these are located at the top of the screen within the ribbon.
It is possible to navigate from within a page or note (a format) directly to the statutory database using the Statutory Data or Statutory Range magnifying glasses on the ribbon. The remaining magnifying glasses enable 'look-ups' for Name Ranges, Compliance Terms (only in IFRS / FRS entities) and Word Items.
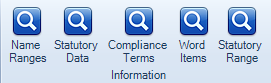
An example of a name range is *TOTREV, to look-up enter TOTREV; a compliance term may be #Term3, to lookup enter #Term3; a word item may be #aw or #wd, to lookup enter #aw and the number 3 e.g. #aw3
The magnifying glasses are also available within the statutory database, you do not need to use Statutory Data magnifying glass as you are already in the Statutory database; instead use the search box at the top left of the screen.
Be aware you are able to open the Statutory Database more than once, so ensure you close it once you have completed your lookup.
Grid Data Entry overview
Grids display data in a tabular format and are characterised by rows and columns. Each grid contains column titles, e.g. Date, Batch Ref, see below. Data is entered in individual cells and, where possible, cells are populated to speed up data entry.

In addition to entering data, drop-down lists may be available. A common drop-down in CCH Accounts Production is the nominal accounts list (chart of accounts). This list appears when you click in a cell under Nominal Analysis e.g. within Receipts, Payments and Journal screens.
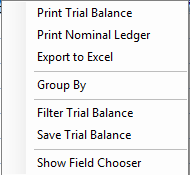
In most grids, right mouse click to gain access to display actions, allowing for quicker navigation/ data entry. For example, from the Trial Balance screen, right click on the grid will show:
Some grids contain the Ellipsis button  , click on this button to open a larger data entry box.
Transaction entry grid
You can control the behaviour of transaction entry grids for Receipts, Payments, Journals and Advisor Journals. Within these screens choose the options on the ribbon to set-up the screen, the set-up will be remembered.
Editing an existing transaction
Click in the cell on the grid to be modified and then make the necessary changes. If the cursor icon does not appear within the selected cell, then you cannot edit it.
Cancelling out of a transaction
If mid-way through inputting a transaction you wish to cancel the entry, press the ESC key to clear the pencil icon to the left of the grid on the input line.